Faqs
Micca MPLAY-HD WLAN
Mac Computer Owners – Photo and Video Playback Issues
Mac computers are great but Mac owners often report odd behaviors when they share a SD card or USB drive between a Mac and non-Mac devices, including Micca digital photo frames and media players. The issue is most likely caused by the following:
If you are using a Mac to copy photos or videos to a SD card or USB drive, it will create a small thumbnail in the same folder as each image/video, preceded by a “._” in the file name. These extra files cause problems on non-Apple devices. There are utilities like this one:
http://www.zeroonetwenty.com/blueharvest/
To remove these extraneous files so that non-Apple devices can work correctly. It is also possible to erase these files without running a utility, such as described in the following web tutorial:
http://www.wikihow.com/Remove-.Ds_Store-Files-on-Mac-Os-X
SD cards or USB drives not showing up on media players
Micca digital media players support the vast majority of commonly used storage device types, including
SD cards and USB hard drives. There are, however, limitations that users should be aware of. The SD
cards and USB drives must meet the following requirements:
- Not password protected or encrypted.
- SD cards up to 32GB, USB drives up to 2TB.
- USB 3.0 drives are supported if the drive is USB 2.0 compatible.
- File system must be FAT/FAT32 or NTFS.
- Partition type must be Master Boot Record (MBR).
While it is easy to determine the size of a drive, users often don’t know what file system or partition
type is being used. This tutorial shows how a Windows PC can be used to find out the file system and
partition type of a drive.
Dowload Tutorial:
Determining Drive Properties Tutorial (opens in a new tab/window)
Mac Users:
Below is an excellent tutorial on how to determine drive properties on OS X:
http://www.dummies.com/how-to/content/how-to-view-information-about-partitions-and-volum.html
How to remux videos into MKV format
The MKV container file format is quickly becoming the most popular choice for digital videos. Consequently, MKV is also the format that is best supported by HD-capable Micca digital media players. This tutorial will show you how to quickly convert a video that’s currently in a different container file format to MKV. It is also useful to remux an existing MKV file to fix any errors that may have been in the original file.
First, download and install the free MKVToolnix software from the following URL:
http://www.bunkus.org/videotools/mkvtoolnix/downloads.html#windows
After installing the the software, run the “mkvmerge GUI” program that’s now available from your Start->Programs->MKVToolnix menu. Follow the directions below to quickly convert videos into MKV:
- Click on the “add” button and find the video file you want to convert into MKV. Once the video has been succsfully added, it’s audio and video tracks will be shown in the “Tracks, chapters and tags” box.
- Click to select the video track in the “Tracks, chapters and tags” box. The video track is identified by “type: video” in parenthesis.
- With the video track highlighted, go to the “Extra options” tab and change the “Compression” field value to “none”. This is a very important step.
- In the “Output filename” box, specify the output file. By default, the program will use the same directory and file name as the original file but with MKV file extension.
- Click “Start muxing” button to begin the conversion. Depending on the size of the original video file, this process should take just a few minutes.
- Click on the “Ok” button once the conversion is complete.
And that’s all there is to it. The resulting file should be about the same size as the original and there is no decrease in video or audio quality. MKVMerge is a very powerful tool and it can do a lot more than what’s described in this guide. For example, it is also possible to add additional audio and subtitle tracks to the video file by adding them in step 1. If these additional capabilities are of interest to you, read the help documentation that is supplied with the software for more information.
Creating network folder shares under Windows 7
This tutorial describes how to create folder shares in Windows 7 without needing a password when accessed by Micca network-capable digital media players.
Step 1: Configure File Sharing
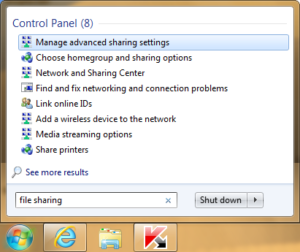
- Click on Start and then type in “File Sharing” in the search box and select “Manage advanced sharing settings” in the list. (See image on the right for example).
- In the “Advanced Sharing Settings” window, set the settings as follows:
- Network discovery: Turn on
- File and printer sharing: Turn on
- Public folder sharing: Turn on
- Password protected sharing: Turn off
Step 2: Copy Files Into Public Folders
The public folders are located in “C:\Users\Public” on your computer. Inside there are public folders for videos, pictures, music, and etc. Copy or move the media files you wish to share into these folders. Warning: Because these are public folders, everyone on your local network will be able to read/write to these folders. Take necessary precautions.
Step 4: Browse Files On Media Player
Reboot the player by disconnecting all power from the player and restarting it. Connect the media player to the network and select “Network” from the main menu to browse for available folder shares. Refer to the media player’s user manual for additional details.
(Optional) Step 5: Sharing Other Folders
If you wish to share folders other than the “Public” folders, follow these steps:
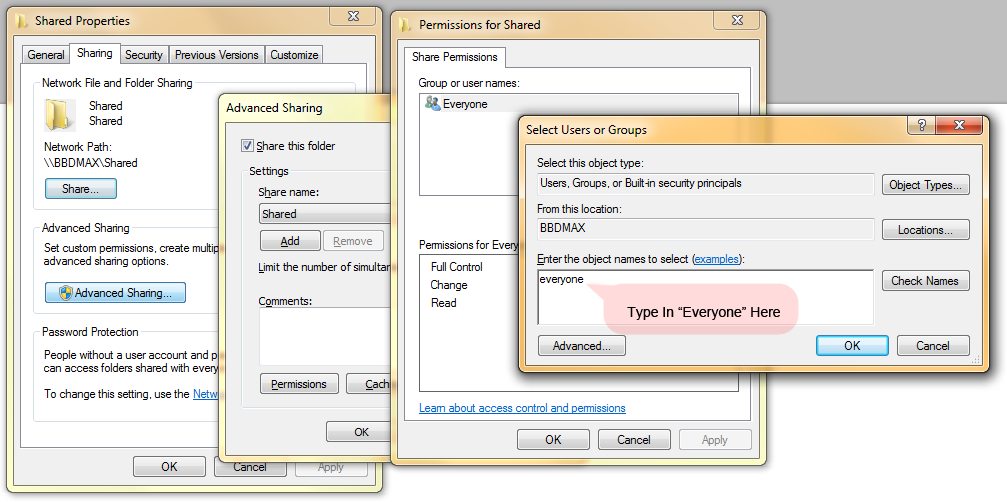
- Find the folder you wish to share
- Right-click on the folder and choose “Properties”.
- In the “Sharing” tab, click on “Advanced Sharing”.
- Check “Share this folder”, and then click on “Permissions”.
- If “Everyone” is not listed under “Group or user names”, click on “Add” and type in “Everyone” and click “OK”. Make sure “Everyone” has at least “Read” permission checked.
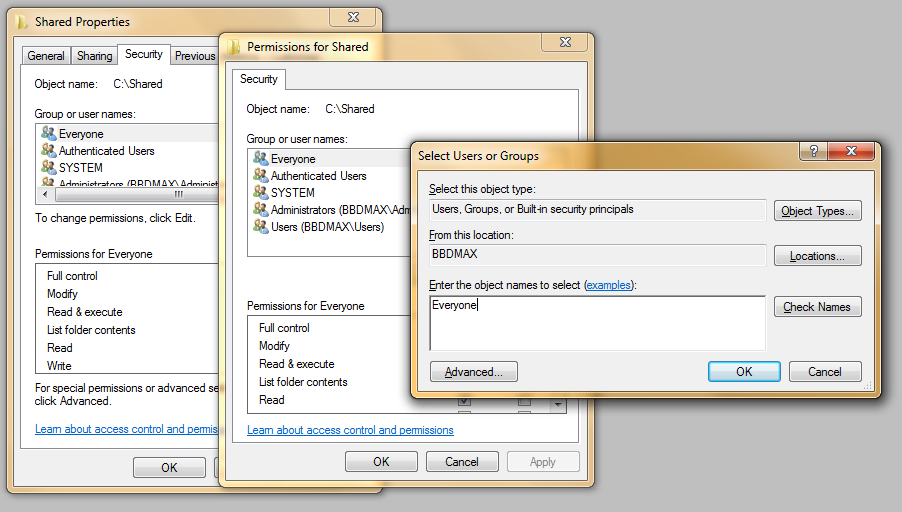
- Click “OK” to accept changes until you get back to the “Sharing” tab.
- Switch to the “Security” tab. If “Everyone” is not listed under “Group or user names”, click on “Edit”, then click “Add”, type in “Everyone” and click “OK”.
- Click “OK” until all windows are closed.
Micca MPLAY-HD WLAN Firmware Update Instructions
Please follow the steps below exactly as described to perform a firmware update on the Micca MPLAY-HD WLAN digital media player:
- Download the firmware ZIP file and extract the “install.img” file onto the root directory (i.e. not in any folders) of a USB drive.
- Plug the USB drive into an empty USB HOST jack on the player.
- With the player turned off and power cable disconnected, use a paper clip or toothpick to press and hold the small pinhole firmware update button on the back of the player.
- While pressing the recovery button, connect the power cable to the player. Continue to hold the firmware update button for 5 more seconds, and then release it.
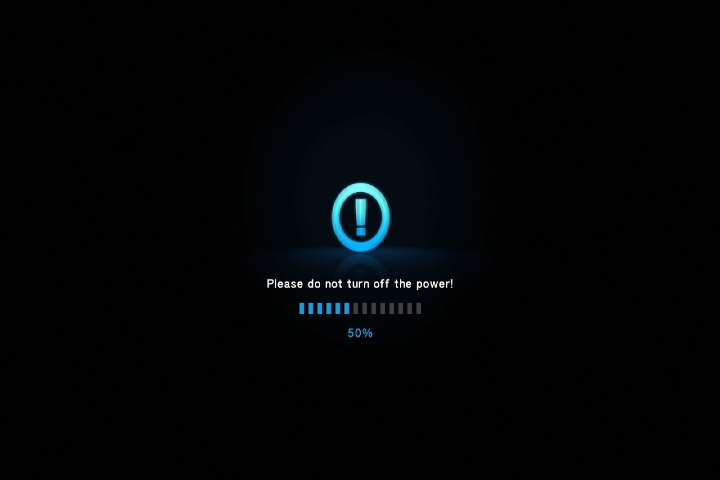
- The recovery mode will begin upgrading the firmware from the USB drive:
- Wait for the player to complete the firmware update. Please be patient as it may take several minutes to complete, during which the screen may be blank or show “no signal”. Do not interrupt the process or power off the player.
- When finished, the player will show the home screen.
Deleted videos, photos, or music files still show up
If you’ve deleted some media files from a USB drive or SD card, yet the deleted files still show up, the issue is likely caused by the presence of Windows Recycling Bin or MacOS Trash Can folders on the USB drive or SD card. Fixing this issue requires emptying the contents of these folders permanently.
Warning: The purpose of the Windows Recyclin Bin and MacOS Trash Can is to allow you to recover previously deleted files that you later need. The steps below permanently empties these folders so you will not be able to recover these files again. Proceed only if you are certain that you do not need these files.
To empty the Recycling Bin folder created by a Windows PC, plug your USB drive into the PC, wait for the drive to show up in Windows Explorer. Right click on the drive and select “Properties”. In the “General” tab, click on “Disk Cleanup”. Place a check mark for “Recyclin Bin”, and click “OK”. This will delete the contents of the Recycling Bin on the USB drive.
For MacOS, there is unfortunately no built-in way to empty just the Trash Can on a USB drive; all Trash Can folders on all drives are emptied by default. To empty the Trash Can for all drives, plug your USB drive into the Mac, wait for it to mount. Next choose Empty Trash under the Finder menu or press Command+Shift+Delete. A pop up will ask you to confirm that you wish to empty the Trash Can.
720p/1080p HD Video Encoding Tutorial
Encoding a video in 720p or 1080p high definition format is easier than ever thanks to the availability of free and well working tools like Handbrake. This tutorial will show you how to use this wonderful tool to recode videos into popular MP4 or MKV formats for playback on Micca products that support 720p and 1080p video playback. To start, download and install Handbrake suitable for your operating system from the link below:
https://handbrake.fr/downloads.php
At the time of this tutorial, the Handbrake version is 1.1.2, your screen might look slightly different but should be very similar.
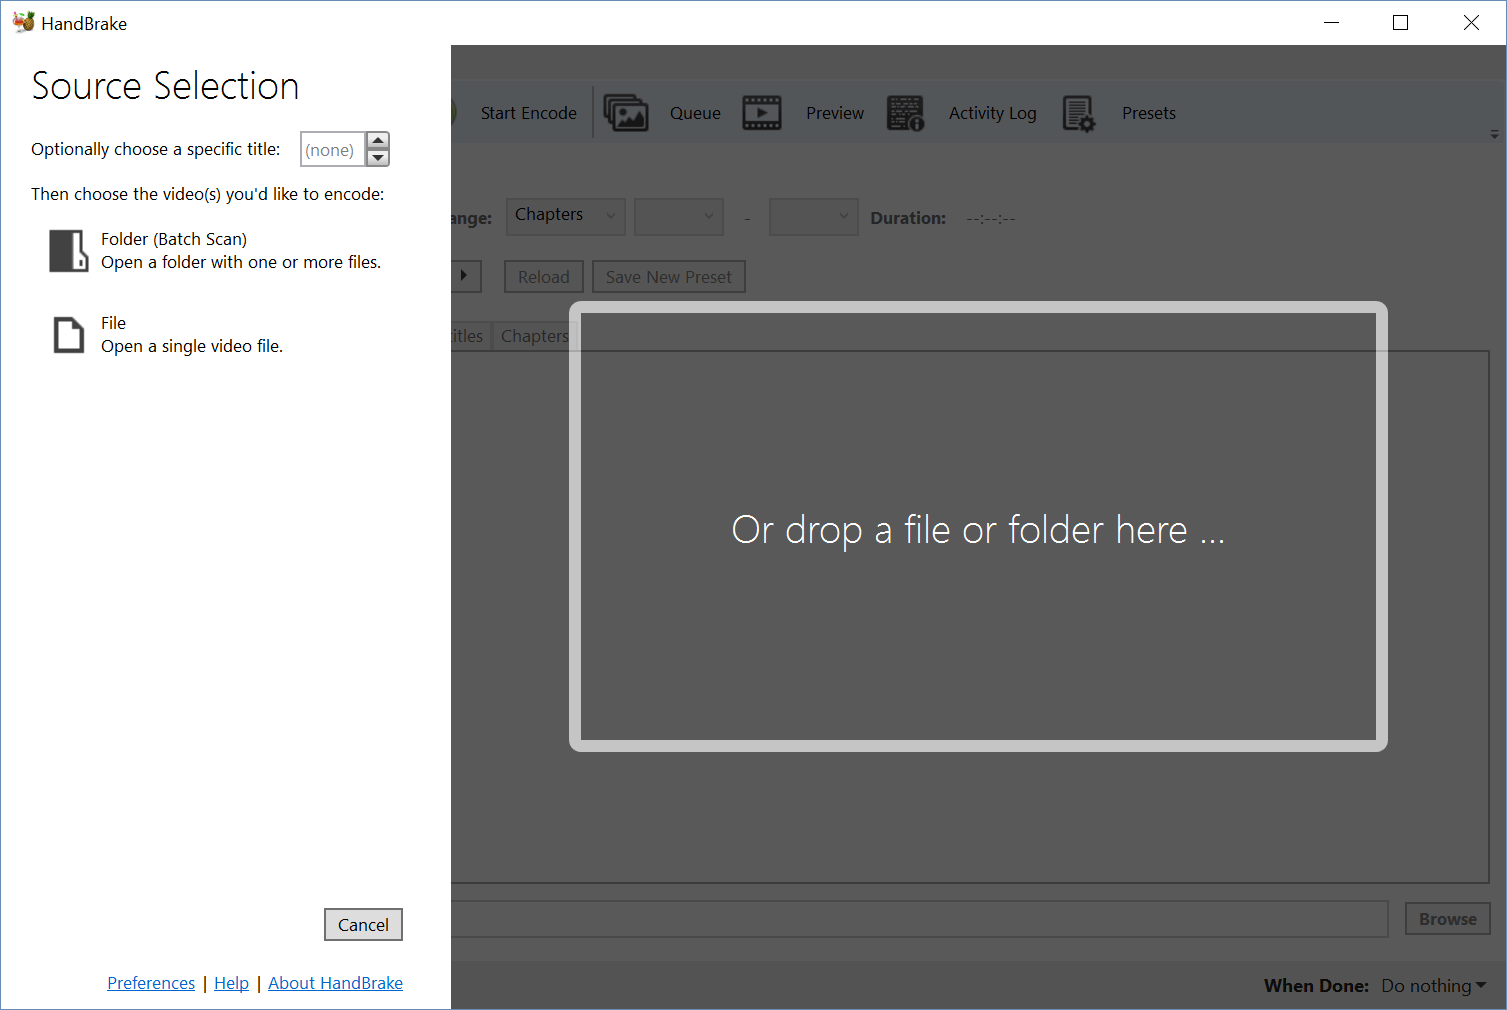
Step 1 – Open the source video
After installing Handbrake, run it and the following window should be displayed. Drag and drop your source video into the Handbrake window to open it.
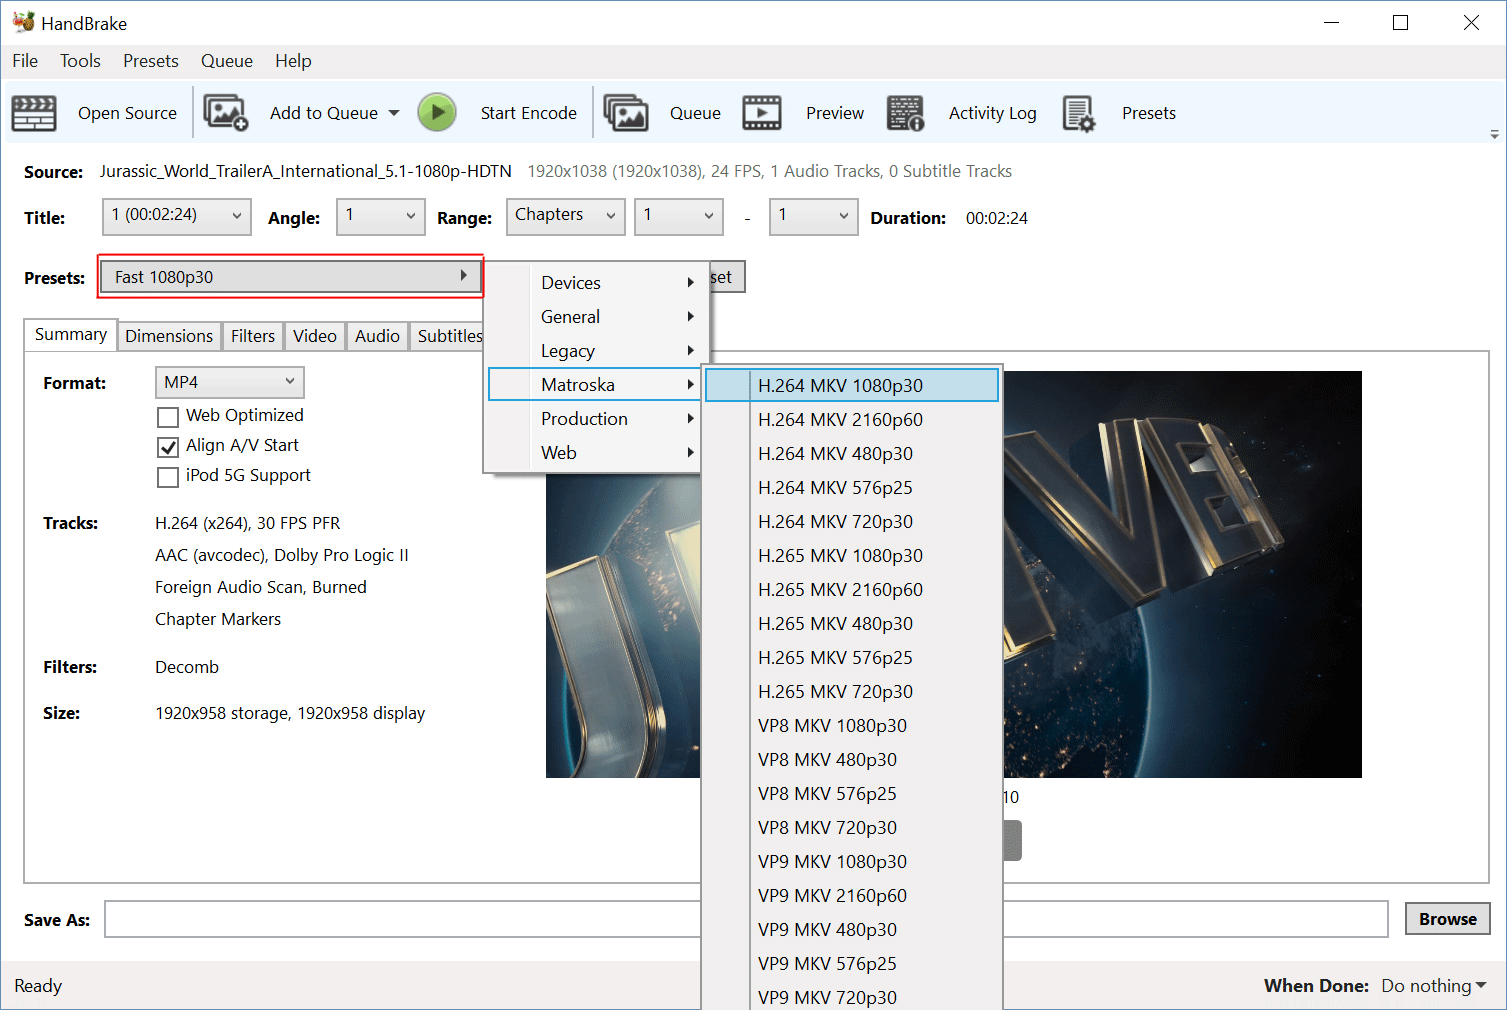
Step 2 – Select a encoding preset
Handbrake as numerous convenient presets built-in that are especially useful for our purpose. Choose preset according to the following:
If you want MKV videos (preferred):
If you want MP4 videos:
For this tutorial we are choosing Matroska->H.264 MKV 1080p30 as shown in the image below
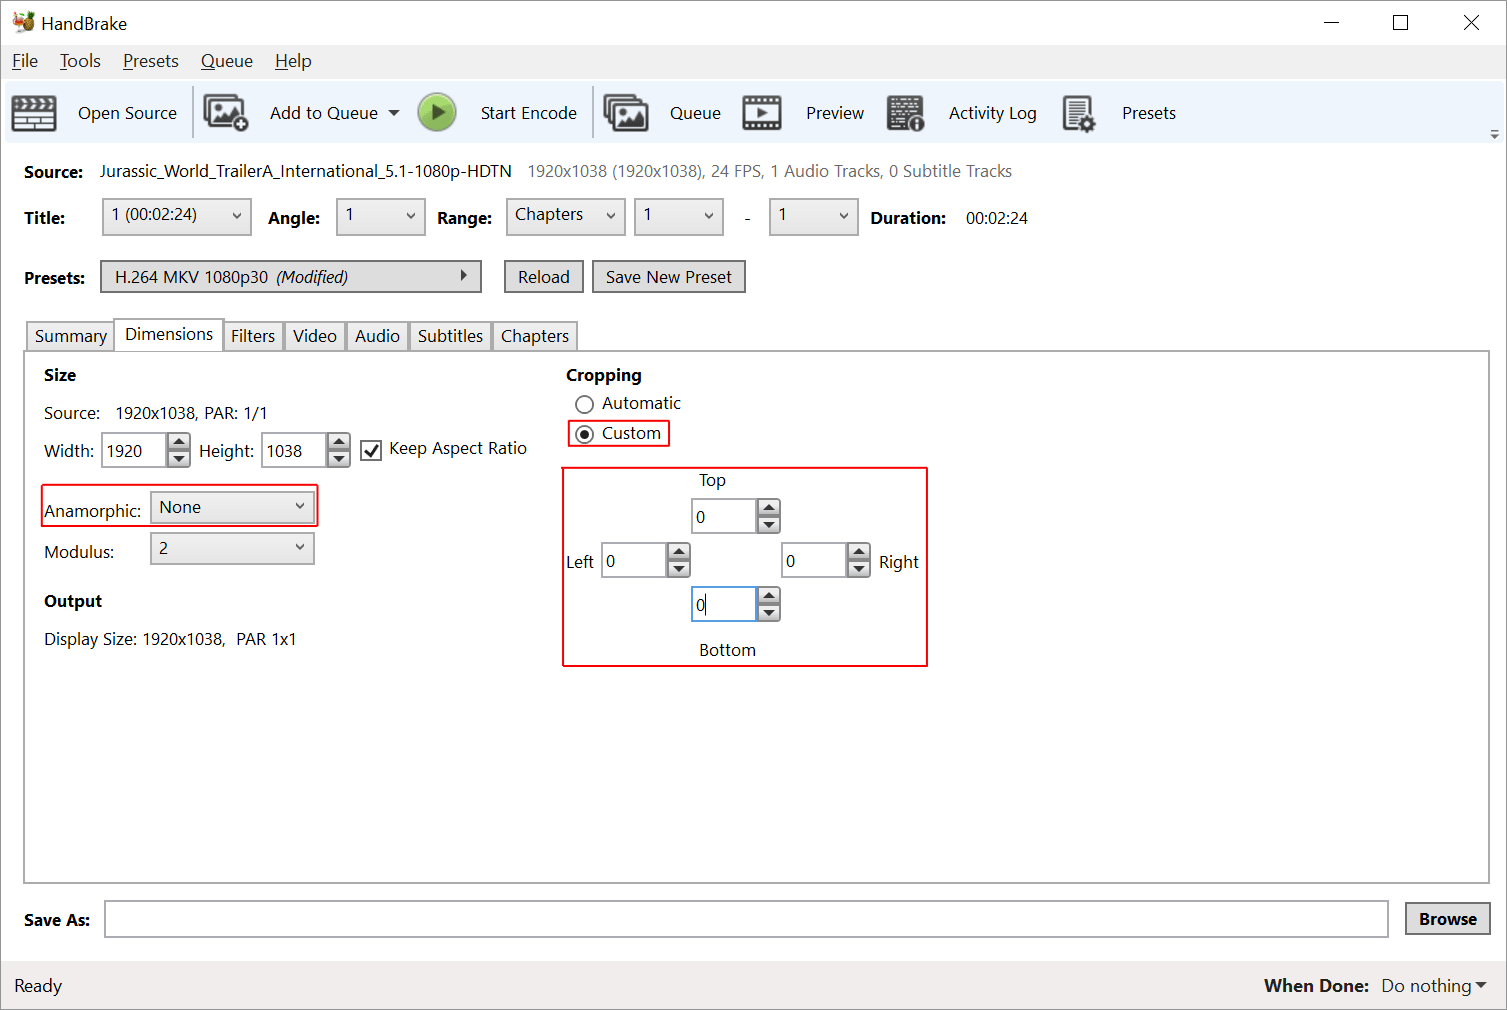
Step 3 – Adjusting Dimensions
Click on the Dimensions tab and make the following changes:
The window should look similar to the following:
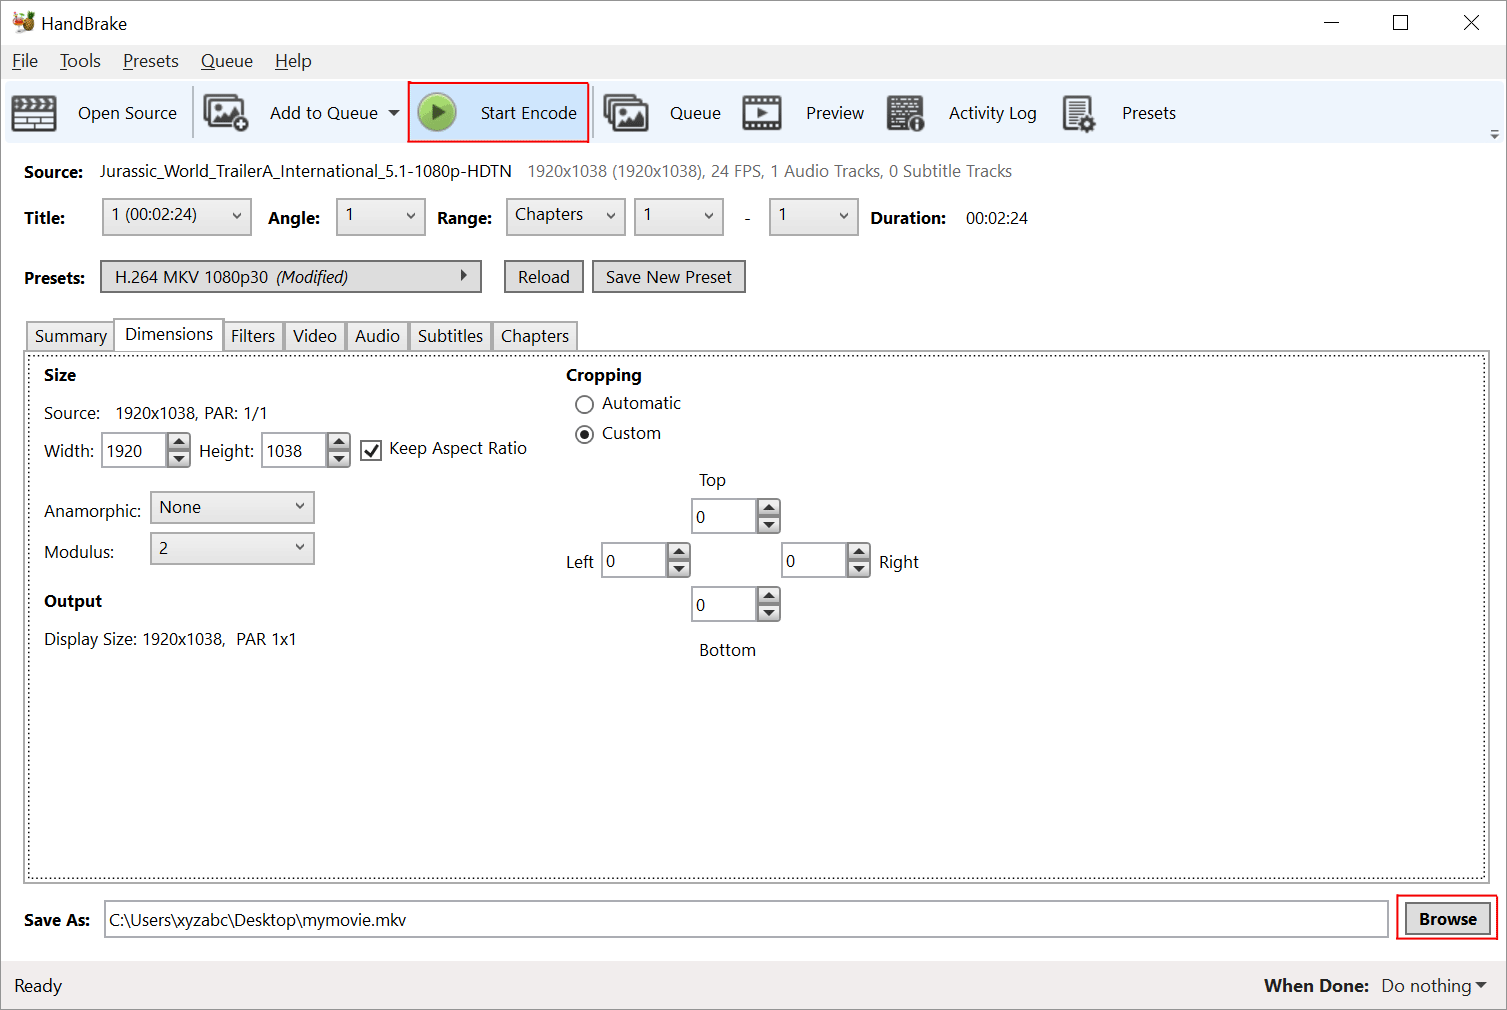
Step 4 – Saving your new video
Almost done! Click on the Browse button and choose a file name and location to save to. Finally, click on the Start Encoding button to begin encoding the new video. After the encoding is done, the new video should play very well on your Micca player.
Other Settings
Handbrake is a powerful piece of software and there are many other possible settings available that are beyond the scope of this tutorial. Here’s a brief introduction on what the settings in the other tabs do:
Filters: Special video processing filters that can be used to remove noise and artifacts from the video.
Video: Encoding settings for the video track. The Quality setting on this tab can be useful even for novice users. Constant quality is the preferred setting. Make small adjustments to this value and do not change more than 2-3 away from the default value.
Audio: Encoding settings for the audio track, can be useful if you want to include multiple sound tracks or have surround sound tracks.
Subtitle: By default Handbrake does not add any subtitles. You can choose to add in subtitles that exists from the source video, or by importing SRT subtitles.
Chapter: By default Handbrake will retain any chapter marks that were in the original video. You can also import chapter marks from an external source if available.