Faqs
Micca EP100 Firmware Update Instructions
Please follow the steps below exactly as described to perform a firmware update on the Micca EP100 digital media player:
- Download the latest the firmware from our website.
- Unpack the firmware ZIP file and copy the install.img file onto an empty USB drive and plug it into the media player. Do not use a SD/SDHC memory card. (Mac users, please use a free utility such as Stuffit Expander which will ensure that the file is unpacked into an .img file rather than a folder.)
- Connect the HDMI cable to the player and set the TV to the appropriate input.
- Unplug the AC adapter from the EP100, wait 10 seconds, and plug it back in.
- Using a paper clip or tooth pick, press and hold the small pinhole recovery button on the back of the player.
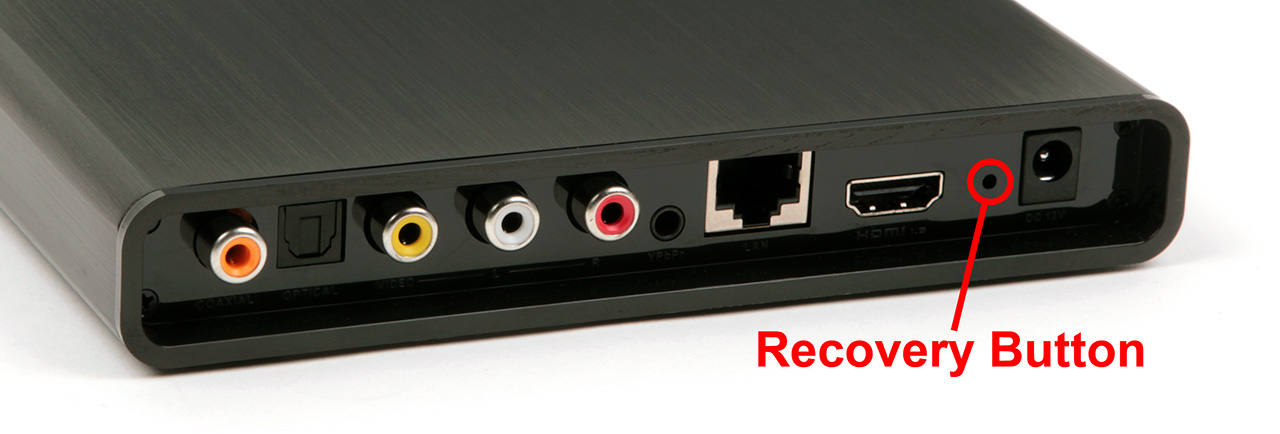
- While pressing the recovery button, press and release the power button on the remote to turn the player on.
- Continue to hold the recovery button for 5 more seconds, then release it.
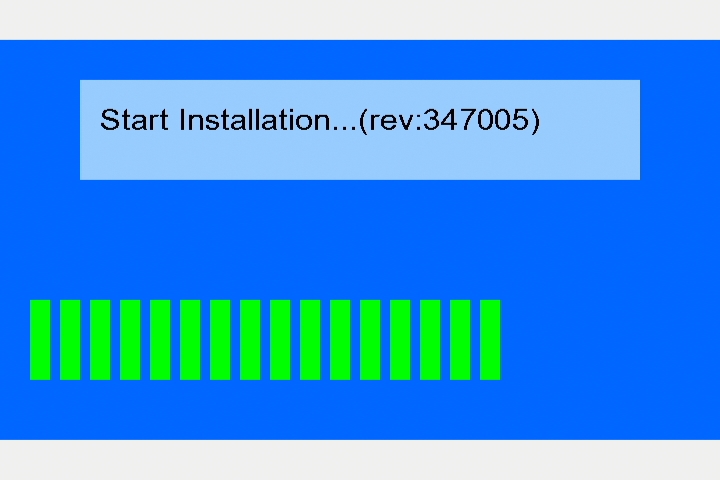
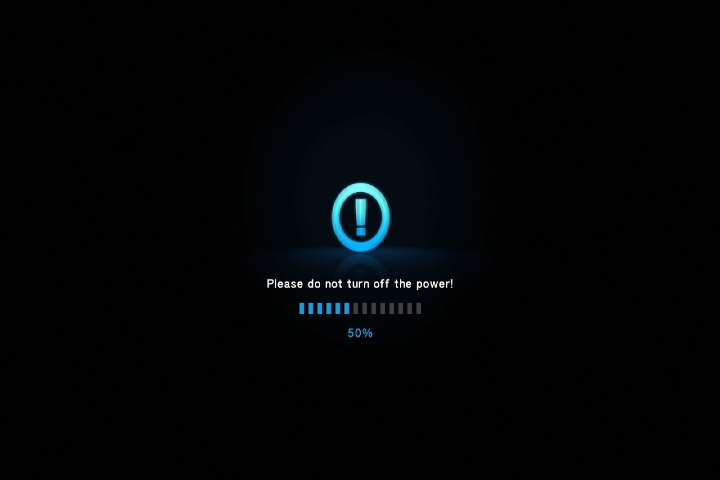
- The recovery mode will begin upgrading the firmware from the USB drive while displaying the following screen.
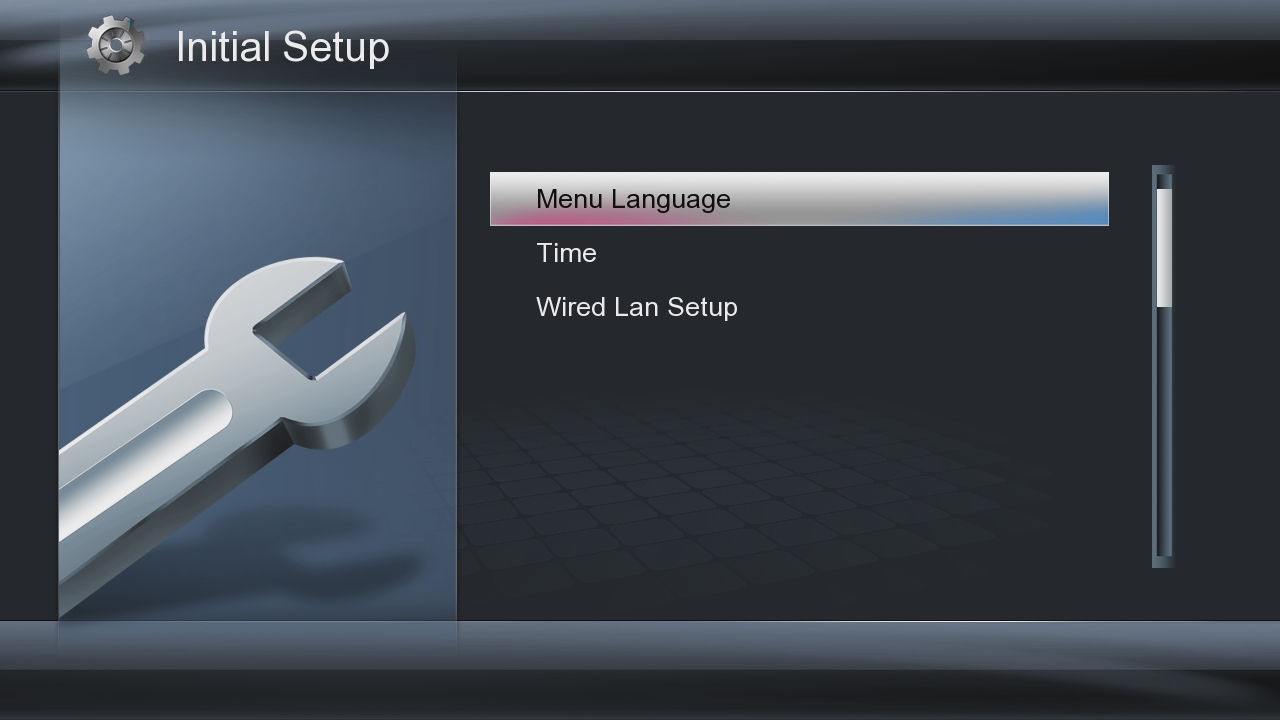
- When finished, the player will reboot and display the initial setup screen:


Micca MPLAY-HD Firmware Update Instructions
Please follow the steps below exactly as described to perform a firmware update on the Micca MPLAY-HD digital media player:
- Download the latest the firmware from our website.
- Find an empty USB flash drive and format it as a FAT32 drive. Do not use a SD/SDHC memory card.
- Unpack the firmware ZIP file and copy the “install.img” file onto the USB flash drive. (Mac users, please use a free utility such as Stuffit Expander which will ensure that the file is unpacked into an .img file rather than a folder.)
- Connect the HDMI cable to the player and set the TV to the appropriate input.
- Unplug the AC adapter from the player, wait 10 seconds.
- While pressing and holding the power button on the front of the player, plug the AC adapter into the player. Continue to hold the power button for 5 more seconds.
- The recovery mode will begin upgrading the firmware from the USB drive while displaying the following screen.

- When finished, the player will reboot and display the initial setup screen

Micca EP600 G2 Firmware Update Instructions
Please follow the steps below exactly as described to perform a firmware update on the Micca EP600 G2 digital media player:
- Download the latest the firmware from our website.
- Unpack the firmware ZIP file and copy the install.img file onto an empty USB drive and plug it into the media player. Do not use a SD/SDHC memory card. (Mac users, please use a free utility such as Stuffit Expander which will ensure that the file is unpacked into an .img file rather than a folder.)
- Connect the HDMI cable to the player and set the TV to the appropriate input.
- Unplug the AC adapter from the EP600 G2, wait 10 seconds, and plug it back in.
- Using a paper clip or tooth pick, press and hold the small pinhole recovery button on the back of the player.
- While pressing the recovery button, press and release the power button on the front of the player.
- Continue to hold the recovery button for 5 more seconds, then release it.
- The recovery mode will begin upgrading the firmware from the USB drive while displaying the following screen.
- When finished, the player will reboot and display the initial setup screen:
Photo Batch Reprocessing Tutorial
Micca digital photo frames display vast majority of photo images quickly and with excellent clarity. However, when there are corrupted or unsupported image files mixed in, customers may experience freezing, slow slideshow speed, or blurry pictures when viewing these photos. When this happens it may be difficult to discover which photos are causing this issue. This tutorial shows you how to quickly fix this issue by saving all photos on to the SD card or USB drive in standard JPG format using a freely available software tool. For Mac OS X users, click here for a tutorial that shows you how to do batch reprocessing using built-in tools.
Windows Users:
- First download and install the free software tool FastStone Image Resizer: http://www.faststone.org/FSResizerDetail.htm
- Copy all your photos into a folder on your computer desktop.
- Delete all photos from the SD card or USB drive – make sure you’ve copied them onto your computer.
- Open FastStone Image Resizer and you should see a screen like below. Click on the Desktop icon to open it.
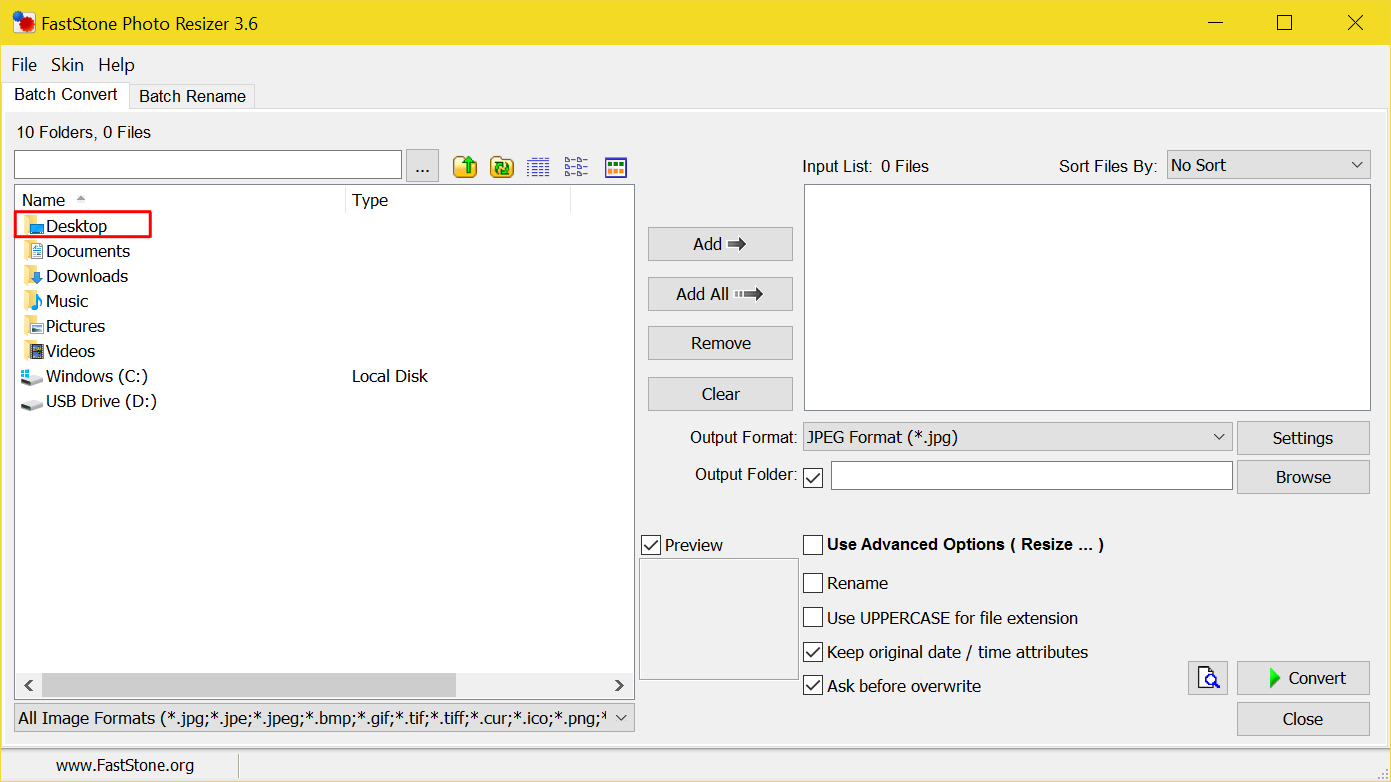
- Highlight the folder with your photos in it, click on the “Add All” button to add the folder to the input list. Next, click on the “Output Folder” “Browse” button, and select your SD card or USB drive as the output folder. For our tutorial, our USB drive is drive D. When finished, click on the “Convert” button.
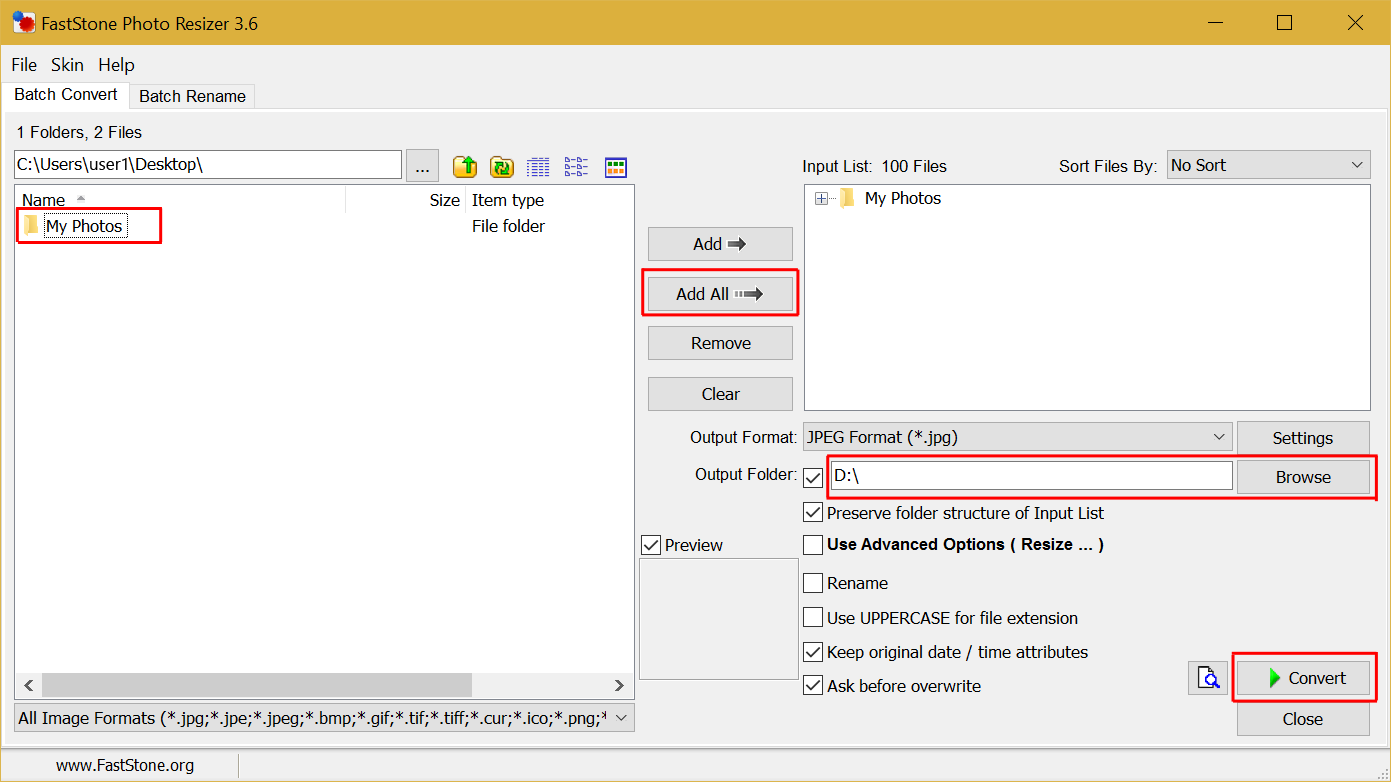
- The photo reprocessing will take place. When finished, all photos on the SD card or USB drive will display well on the digital photo frame.
Photos not displaying in sequential order
To display photos in sequence, two things are needed:
- Set the photo frame’s photo display sequence to “sequential” – refer to the photo frame’s user’s manual on how to do this.
- Name the photos in a way that organizes them sequentially
Naming the photos properly is important since improper naming will cause the photos to not display in the expected sequential order. Be sure to name the photos using a consistent naming convention that is 8 characters or less. For example, name the photos img00001.jpg, img00002.jpg, img00003.jpg, and so on. The photo frame will display images like these in alphabetical order one after the other. Do not use photo names that are longer than 8 characters, such as my-image-001.jpg.
Lastly, when copying the renamed photos onto the SD card, it’s important to select all of the photos, and then click-and-drag the photos by the very first photo (img00001.jpg) and copy it to the SD card. This ensures that the photos are copied in sequence starting from the first photo. Some computers require this method of copying to ensure that the photos are displayed in sequence.
File name length does not affect random photo displays so there is no need to give photos any specific naming convention for random playback.
Videos show “Not Supported” error message
Micca digital photo frames are able to playback standard-definition videos of certain supported formats. When encountering a video that is not supported by one of these devices, it is necessary to convert the video into a compatible format. A tutorial on performing the conversion is provided here. Please follow the directions within the tutorial and contact our support team if you have any questions.
Dowload Tutorial:
Photo Frame Video Conversion Tutorial (opens in a new tab/window)
Photo frame freezes or stops playing photos
There are times when a few corrupt or incorrectly formatted photos will cause odd behaviors from digital photo frames or media players. While computers have powerful software and hardware to skip or handle these files, inexpensive electronics will often experience difficulties. The tutorial linked below uses the free image utility FastStone Image Viewer to reprocess images in batch mode, which quickly fixes corrupt or incorrectly formatted images.
Tutorial Link: Image Batch Reprocessing Tutorial
Mac Computer Owners – Photo and Video Playback Issues
Mac computers are great but Mac owners often report odd behaviors when they share a SD card or USB drive between a Mac and non-Mac devices, including Micca digital photo frames and media players. The issue is most likely caused by the following:
If you are using a Mac to copy photos or videos to a SD card or USB drive, it will create a small thumbnail in the same folder as each image/video, preceded by a “._” in the file name. These extra files cause problems on non-Apple devices. There are utilities like this one:
http://www.zeroonetwenty.com/blueharvest/
To remove these extraneous files so that non-Apple devices can work correctly. It is also possible to erase these files without running a utility, such as described in the following web tutorial:
http://www.wikihow.com/Remove-.Ds_Store-Files-on-Mac-Os-X
SD cards or USB drives not showing up on media players
Micca digital media players support the vast majority of commonly used storage device types, including
SD cards and USB hard drives. There are, however, limitations that users should be aware of. The SD
cards and USB drives must meet the following requirements:
- Not password protected or encrypted.
- SD cards up to 32GB, USB drives up to 2TB.
- USB 3.0 drives are supported if the drive is USB 2.0 compatible.
- File system must be FAT/FAT32 or NTFS.
- Partition type must be Master Boot Record (MBR).
While it is easy to determine the size of a drive, users often don’t know what file system or partition
type is being used. This tutorial shows how a Windows PC can be used to find out the file system and
partition type of a drive.
Dowload Tutorial:
Mac Users:
Below is an excellent tutorial on how to determine drive properties on OS X:
http://www.dummies.com/how-to/content/how-to-view-information-about-partitions-and-volum.html
Photo frame repeats some photos more often than others
Some customers may notice that the photo frame repeats a few photos a couple of times within a relatively short period of time such as an hour or two, even though there are many photos on the SD card and not all photos have been displayed yet.
The cause of this behavior is that the photo frame displays photos in a purely random fashion, where it picks the next picture to show by pure chance. If there are only a few hundred photos loaded on the SD card, then it is statistically very likely that one or a few photos will be repeated within a short period of time. This effect is also more noticeable if the slide show speed is set to a relatively fast speed, such as 3, 5, or 15 seconds.
This effect becomes much less noticeable once there are a thousand or more photos on the SD card, and if the slide show speed is set for a longer duration such as 1 minute. We hope these recommendations will help improve the random playback for your photos.
Why is the impedance 4-8 Ohms? Will it work with my receiver?
Micca is one of the few manufacturers that specifies the impedance of its speakers as a range, rather than a fixed nominal value. The impedance of a speaker varies depending on the frequency being played, and it is normal for most 8ohm rated speakers have impedance that dip as low as 4ohms or even lower.
While the Micca speakers work just fine with most amplifiers and receivers rated for speakers designed to handle 6ohm or 8ohm speakers, the 4-8ohm rating is a reminder to users that these speakers do have impedance that go down to as low as 4ohms and care should be taken with the listening volume so as not to damage the amplifier or speakers. Please observe the following precautions:
- Do not play the speakers at a volume where there is audible distortion
- If the amplifier’s output protection is triggered, immediately discontinue use
- Ensure that the amplifier has plenty of ventilation and is not in an enclosed space
- If the amplifier has a “4Ohm” or “High Current” mode, enable it
How to remux videos into MKV format
The MKV container file format is quickly becoming the most popular choice for digital videos. Consequently, MKV is also the format that is best supported by HD-capable Micca digital media players. This tutorial will show you how to quickly convert a video that’s currently in a different container file format to MKV. It is also useful to remux an existing MKV file to fix any errors that may have been in the original file.
First, download and install the free MKVToolnix software from the following URL:
http://www.bunkus.org/videotools/mkvtoolnix/downloads.html#windows
After installing the the software, run the “mkvmerge GUI” program that’s now available from your Start->Programs->MKVToolnix menu. Follow the directions below to quickly convert videos into MKV:
- Click on the “add” button and find the video file you want to convert into MKV. Once the video has been succsfully added, it’s audio and video tracks will be shown in the “Tracks, chapters and tags” box.
- Click to select the video track in the “Tracks, chapters and tags” box. The video track is identified by “type: video” in parenthesis.
- With the video track highlighted, go to the “Extra options” tab and change the “Compression” field value to “none”. This is a very important step.
- In the “Output filename” box, specify the output file. By default, the program will use the same directory and file name as the original file but with MKV file extension.
- Click “Start muxing” button to begin the conversion. Depending on the size of the original video file, this process should take just a few minutes.
- Click on the “Ok” button once the conversion is complete.
And that’s all there is to it. The resulting file should be about the same size as the original and there is no decrease in video or audio quality. MKVMerge is a very powerful tool and it can do a lot more than what’s described in this guide. For example, it is also possible to add additional audio and subtitle tracks to the video file by adding them in step 1. If these additional capabilities are of interest to you, read the help documentation that is supplied with the software for more information.
Micca Speck Does Not Recognize Certain Seagate Expansion Desktop USB Hard Drives
The Micca Speck does not recognize certain Seagate Expansion desktop USB hard drives including the following models:
- STBV2000100 – 2TB USB 3.0
- STBV1000100 – 1TB USB 3.0
The affected Seagate Expansion USB hard drives use their own power supply and has a delayed turn-on mechanism that is not supported by the Micca Speck media player. When connected to the Micca Speck, the Speck detects the drive but is not able to read its contents or play any media files from it. Older Seagate Expansion desktop USB hard drives, as well as Seagate portable USB hard drives are not affected by this compatibility issue.
There has been no reports of incompatibility with other brands of external desktop USB hard drives such as Western Digital or Toshiba. This issue is unique to the specific Seagate USB hard drive models listed above.
Photos show up as pixelated or takes very long time to load
If certain photos show up on the photo frame as pixelated and blurry but looks perfectly fine on a computer, it is most likely due to the photo being a progressive JPG image file. Progressive JPGs were created during the days of dial-up Internet to allow partial image loading on slow connections. They are obsolete and should all be converted to normal JPG files. While computers have powerful software and hardware to handle progressive JPGs, inexpensive electronics will often experience difficulties displaying them. Luckily, these files are easy to detect since they show up pixelated or takes a long time to load. The tutorial linked below uses the free image utility FastStone Image Viewer to reprocess progressive images in batch mode, which quickly converts them to normal JPGs.
Tutorial Link: Image Batch Reprocessing Tutorial
Micca MPLAY-HD WLAN Firmware Update Instructions
Please follow the steps below exactly as described to perform a firmware update on the Micca MPLAY-HD WLAN digital media player:
- Download the firmware ZIP file and extract the “install.img” file onto the root directory (i.e. not in any folders) of a USB drive.
- Plug the USB drive into an empty USB HOST jack on the player.
- With the player turned off and power cable disconnected, use a paper clip or toothpick to press and hold the small pinhole firmware update button on the back of the player.
- While pressing the recovery button, connect the power cable to the player. Continue to hold the firmware update button for 5 more seconds, and then release it.
- The recovery mode will begin upgrading the firmware from the USB drive:
- Wait for the player to complete the firmware update. Please be patient as it may take several minutes to complete, during which the screen may be blank or show “no signal”. Do not interrupt the process or power off the player.
- When finished, the player will show the home screen.
Deleted videos, photos, or music files still show up
If you’ve deleted some media files from a USB drive or SD card, yet the deleted files still show up, the issue is likely caused by the presence of Windows Recycling Bin or MacOS Trash Can folders on the USB drive or SD card. Fixing this issue requires emptying the contents of these folders permanently.
Warning: The purpose of the Windows Recyclin Bin and MacOS Trash Can is to allow you to recover previously deleted files that you later need. The steps below permanently empties these folders so you will not be able to recover these files again. Proceed only if you are certain that you do not need these files.
To empty the Recycling Bin folder created by a Windows PC, plug your USB drive into the PC, wait for the drive to show up in Windows Explorer. Right click on the drive and select “Properties”. In the “General” tab, click on “Disk Cleanup”. Place a check mark for “Recyclin Bin”, and click “OK”. This will delete the contents of the Recycling Bin on the USB drive.
For MacOS, there is unfortunately no built-in way to empty just the Trash Can on a USB drive; all Trash Can folders on all drives are emptied by default. To empty the Trash Can for all drives, plug your USB drive into the Mac, wait for it to mount. Next choose Empty Trash under the Finder menu or press Command+Shift+Delete. A pop up will ask you to confirm that you wish to empty the Trash Can.
How to make photo rotations permanent
Micca brand photo frames are designed to display photos as-is without making any changes to them. This ensures that your photos are never accidentally damaged or overwritten. The rotation function provided by the photo frame only changes how the current photo is shown on screen – the rotation change is not saved to the photo file. Therefore, the next time the photo is shown, it is again displayed without any rotation applied.
Depending on how a photo is taken and saved, the image may be incorrectly rotated and show up sideways or upside down on a Micca photo frame. This same photo may look just fine on another device or on the computer since not all devices or software correctly use the rotation flag stored in the image file. Micca photo frames use EXIF rotation flags so it is important to ensure that they are set appropriately. This tutorial provides you with instructions on fixing incorrectly rotated photos.
Dowload Tutorial:
Mac OS X Users:
The above tutorial is written to be used with the FastStone image viewer software. Unfortunately FastStone is not available for Macs, but a similar software is available and can be used to perform the same rotation fix based on the tutorial:
720p/1080p HD Video Encoding Tutorial
Encoding a video in 720p or 1080p high definition format is easier than ever thanks to the availability of free and well working tools like Handbrake. This tutorial will show you how to use this wonderful tool to recode videos into popular MP4 or MKV formats for playback on Micca products that support 720p and 1080p video playback. To start, download and install Handbrake suitable for your operating system from the link below:
https://handbrake.fr/downloads.php
At the time of this tutorial, the Handbrake version is 1.1.2, your screen might look slightly different but should be very similar.
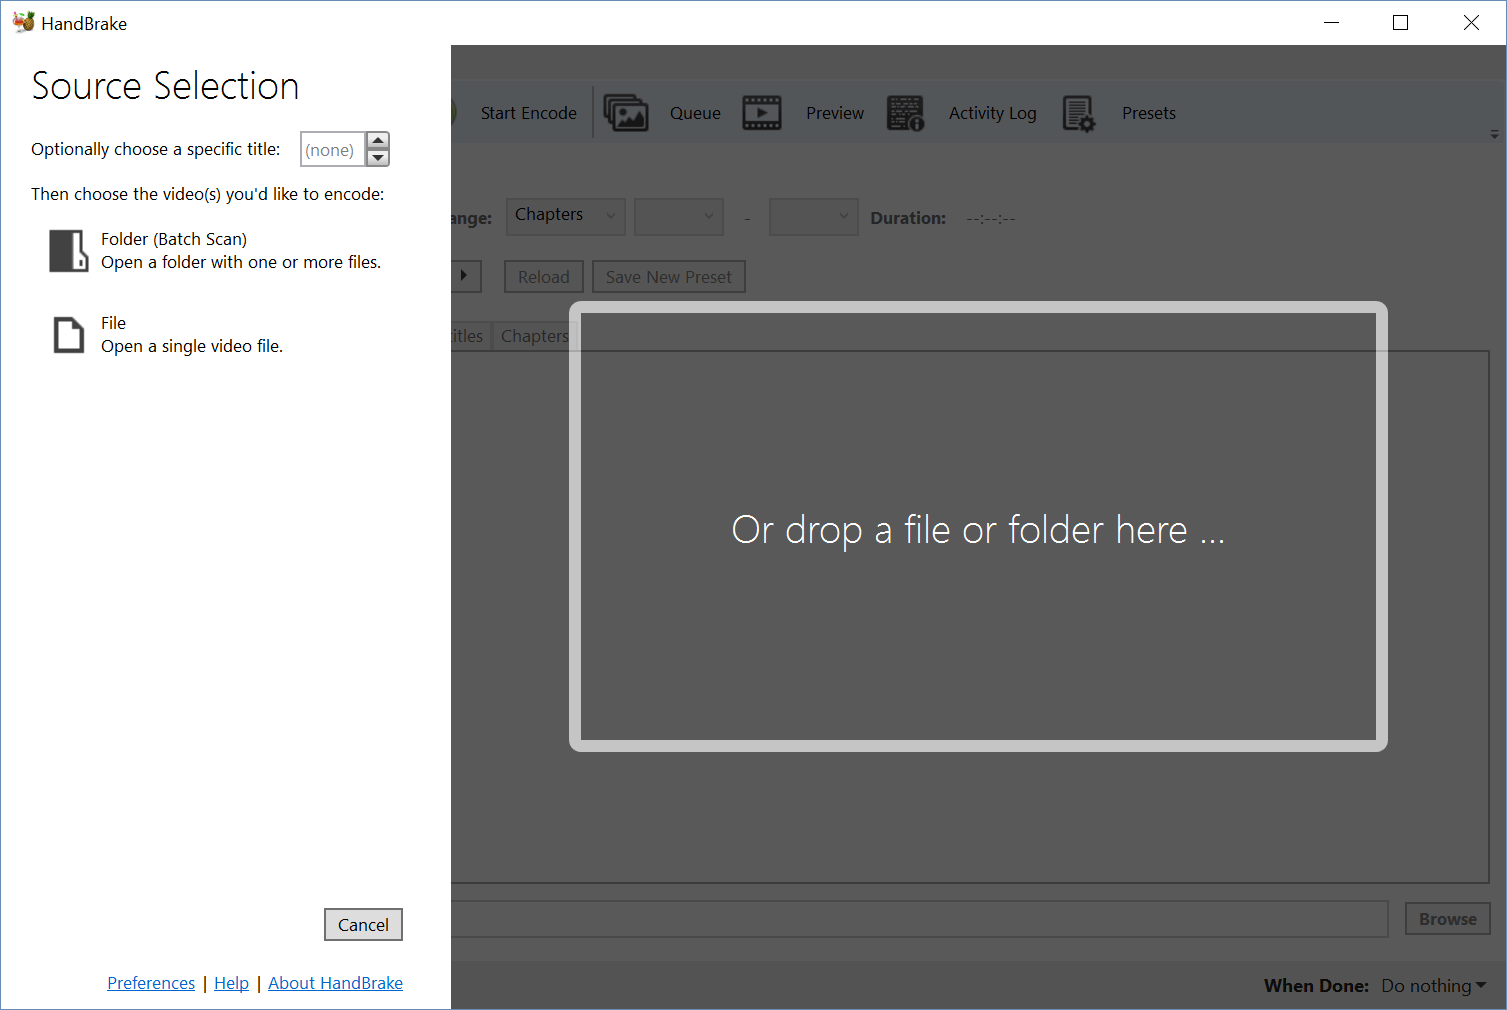
Step 1 – Open the source video
After installing Handbrake, run it and the following window should be displayed. Drag and drop your source video into the Handbrake window to open it.
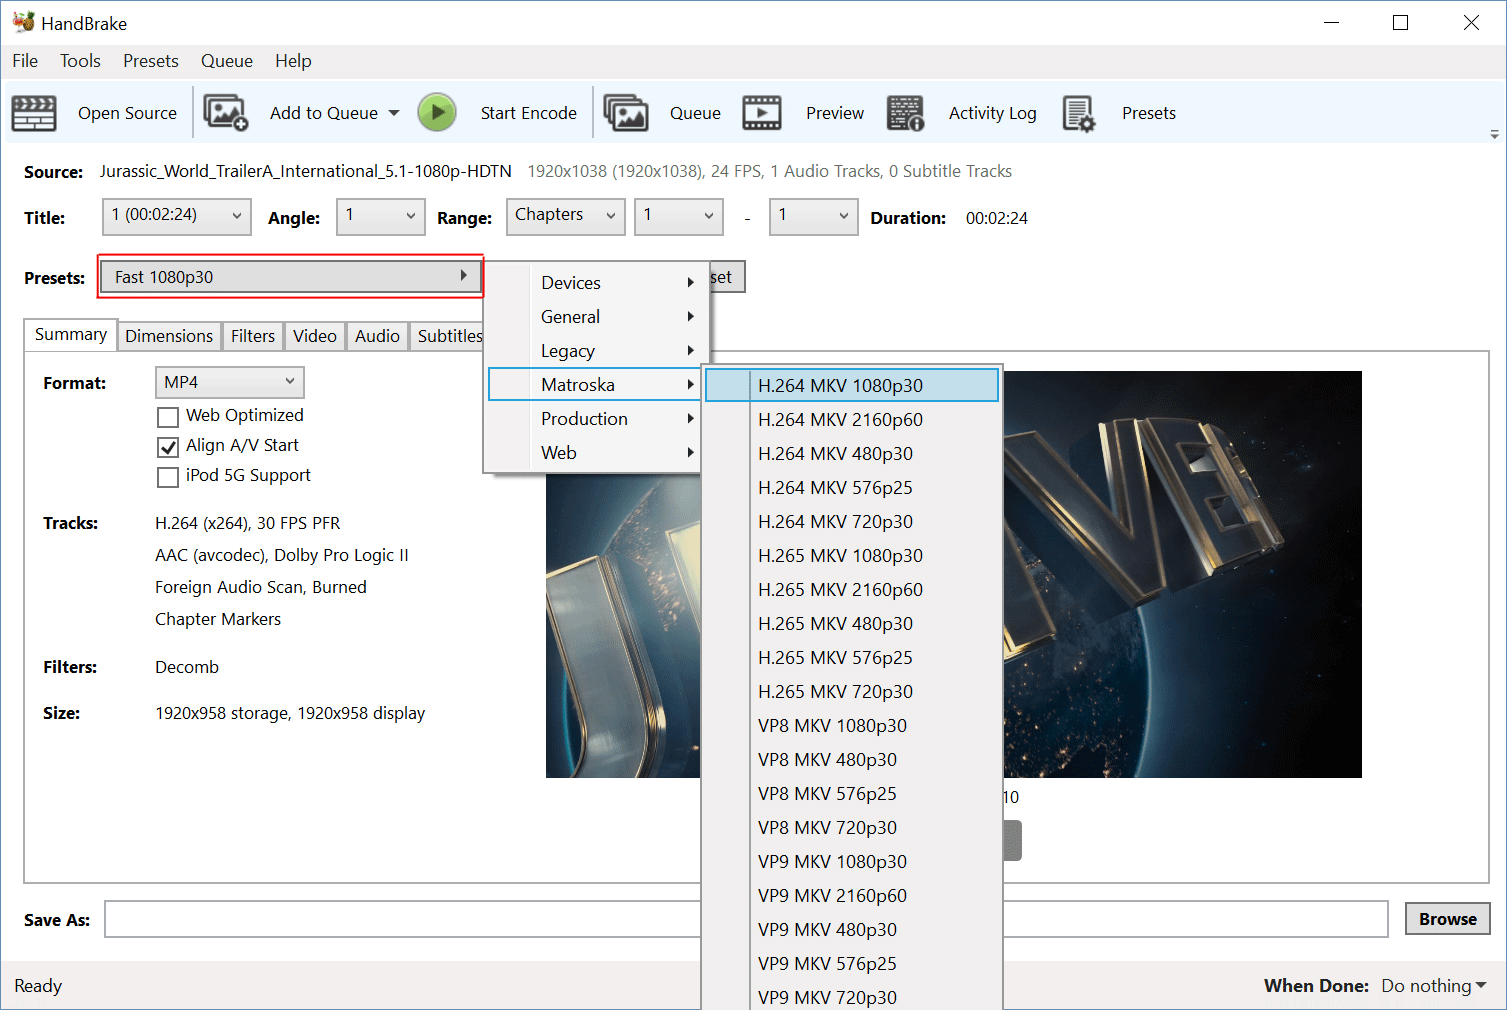
Step 2 – Select a encoding preset
Handbrake as numerous convenient presets built-in that are especially useful for our purpose. Choose preset according to the following:
If you want MKV videos (preferred):
If you want MP4 videos:
For this tutorial we are choosing Matroska->H.264 MKV 1080p30 as shown in the image below
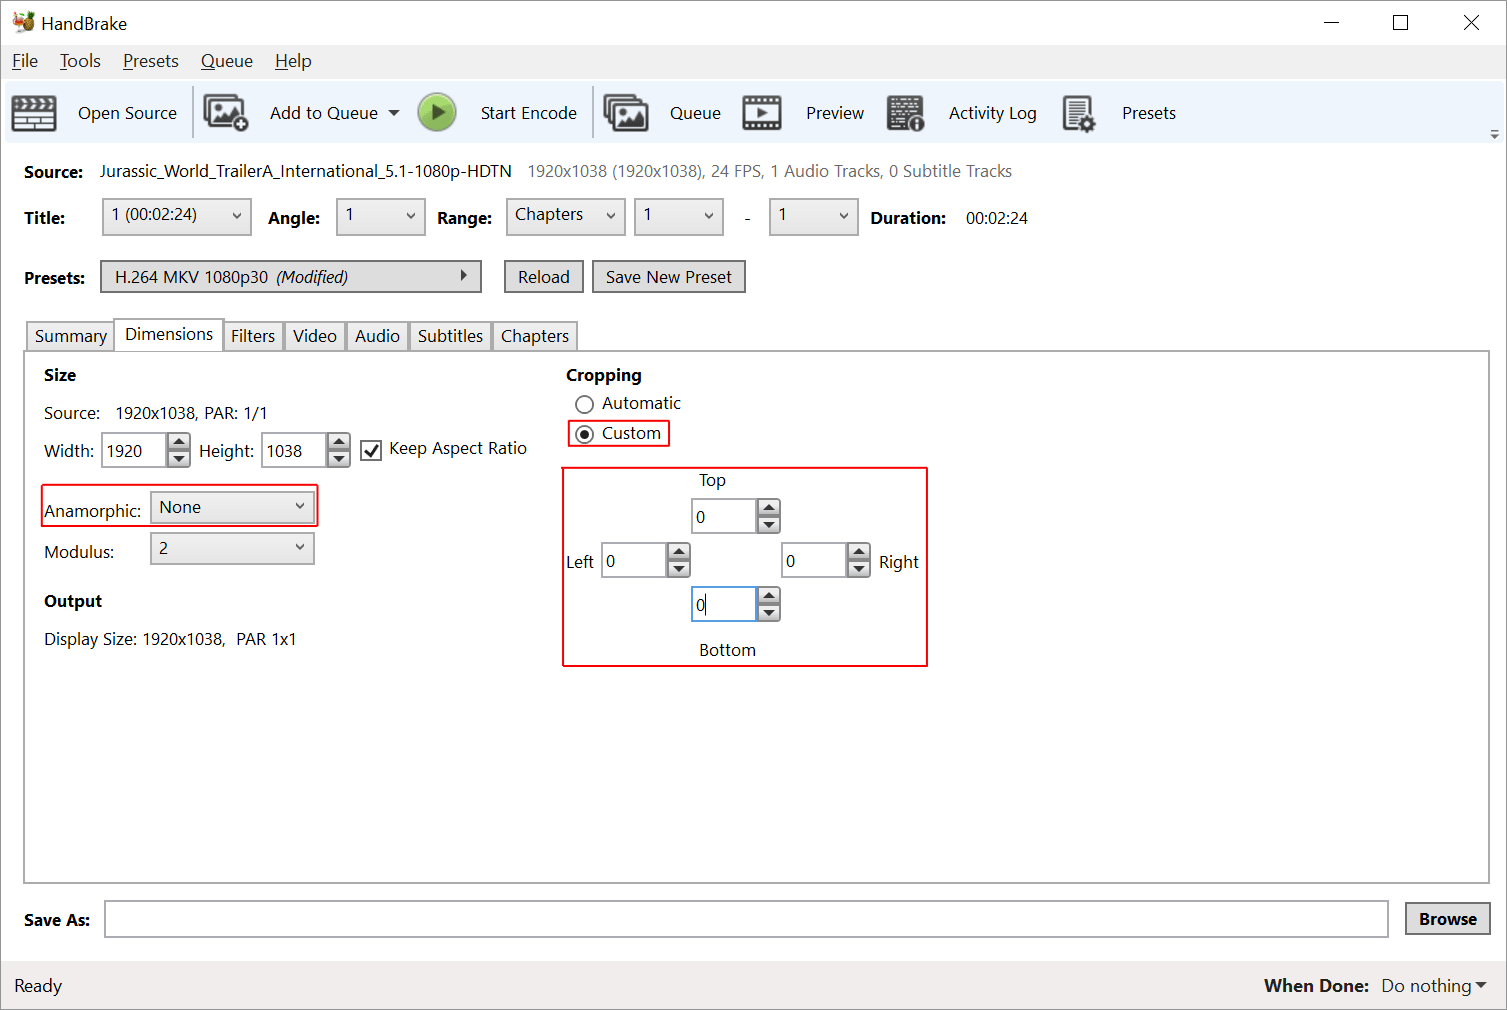
Step 3 – Adjusting Dimensions
Click on the Dimensions tab and make the following changes:
The window should look similar to the following:
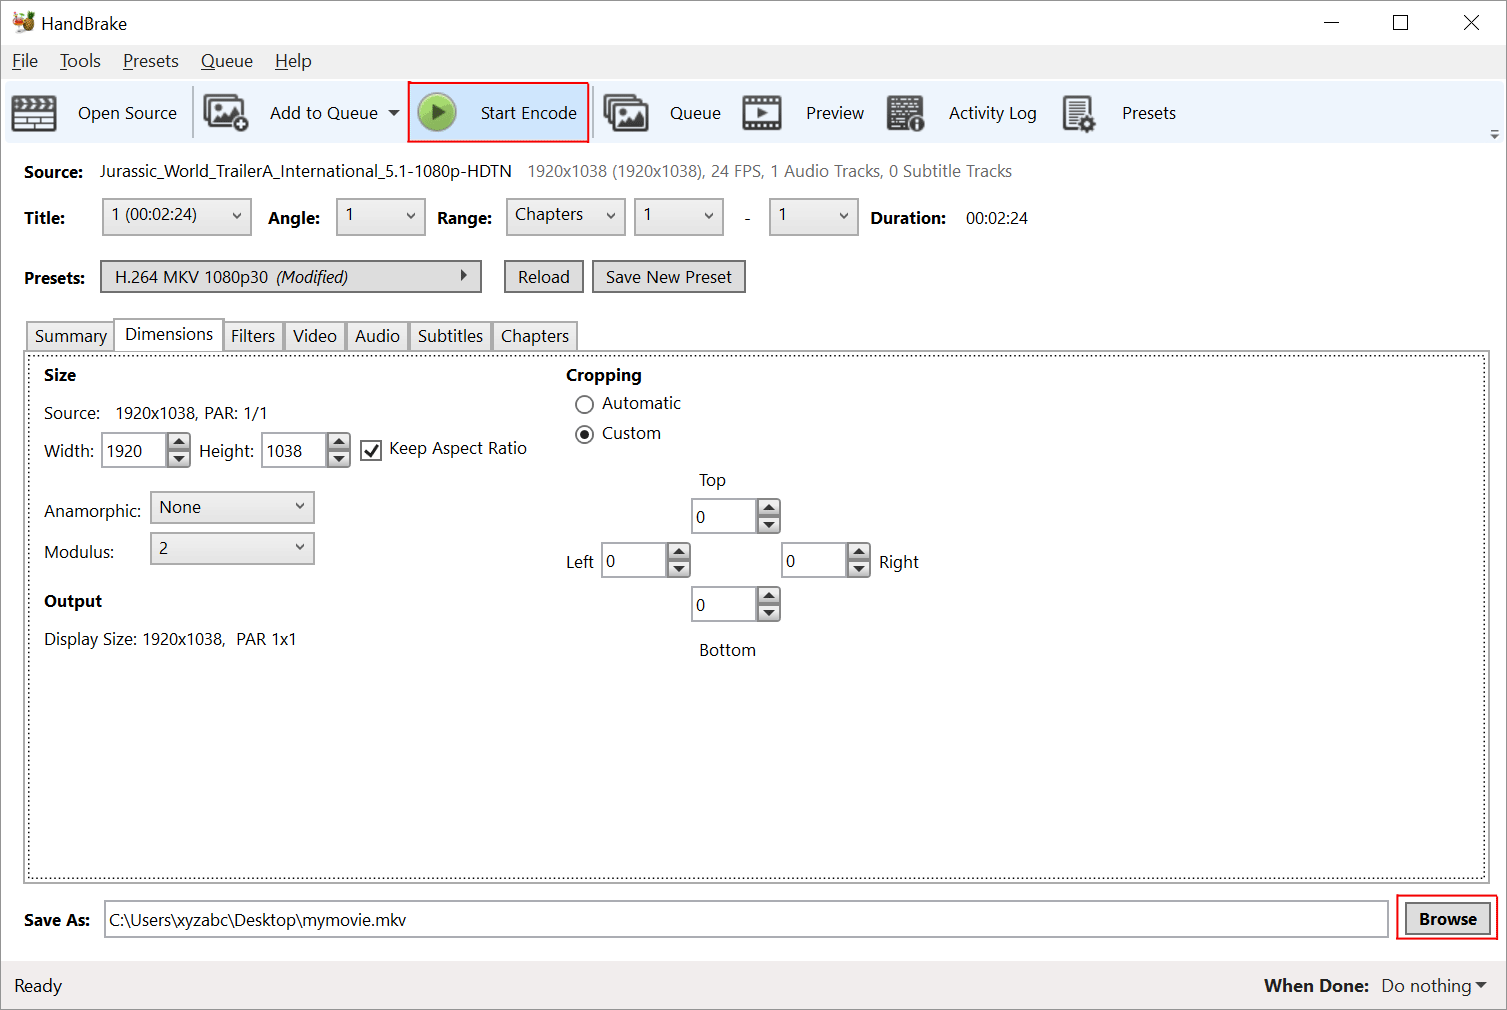
Step 4 – Saving your new video
Almost done! Click on the Browse button and choose a file name and location to save to. Finally, click on the Start Encoding button to begin encoding the new video. After the encoding is done, the new video should play very well on your Micca player.
Other Settings
Handbrake is a powerful piece of software and there are many other possible settings available that are beyond the scope of this tutorial. Here’s a brief introduction on what the settings in the other tabs do:
Filters: Special video processing filters that can be used to remove noise and artifacts from the video.
Video: Encoding settings for the video track. The Quality setting on this tab can be useful even for novice users. Constant quality is the preferred setting. Make small adjustments to this value and do not change more than 2-3 away from the default value.
Audio: Encoding settings for the audio track, can be useful if you want to include multiple sound tracks or have surround sound tracks.
Subtitle: By default Handbrake does not add any subtitles. You can choose to add in subtitles that exists from the source video, or by importing SRT subtitles.
Chapter: By default Handbrake will retain any chapter marks that were in the original video. You can also import chapter marks from an external source if available.
Different versions of Micca MB42X and MB42X-C: Original, MKII, MKIII
At Micca, we continuously look for ways to improve our products for better performance, quality, and value. Since introduction, MB42X and MB42X-C speakers have undergone evolutionary updates as described below:
Original Release – Based on MB42, with the following differences
- 8-element 12dB/Octave crossover upgrade
- Matte black vinyl
- Magnetic grill system.
MKII – Serial numbers start with “MB42XMKII” or “MB42XCMKII”.
- Slight adjustments to woofer and tweeter response characteristics
- Flared plastic port tube (MB42X only)
- Additional internal bracing at four side enclosure walls
- Poly fill stuffing added
MKIII – Serial numbers start with “MB42X3” or “MB42XC3”
- 9-element 18dB/Octave crossover
- Tighter driver response tolerance
MKIII crossovers are backwards compatible with all previous versions and provides the following benefits:
- Steeper slopes for reduced distortion and acoustic lobing
- Adjusted roll off frequency for improved phase integration
- Updated driver level matching to result in overall smoother response
Micca OriGen+ does not install, not recognized by computer
A small batch of Micca OriGen+ was shipped with defective USB cables. If your Micca OriGen+ does not install correctly or is not detected by the computer this may be caused by a defective USB cable.
The defective USB cable will provide power to the OriGen but will not pass data correctly. When this occurs, the power light on the OriGen+ will turn on in red color instead of blue. When this happens, try a different USB cable to see if this resolves the issue.
If the USB cable you received with the OriGen+ is defective, please contact our support team at support@miccatorn.com to receive a replacement USB cable.
Creating network folder shares under Windows 7
This tutorial describes how to create folder shares in Windows 7 without needing a password when accessed by Micca network-capable digital media players.
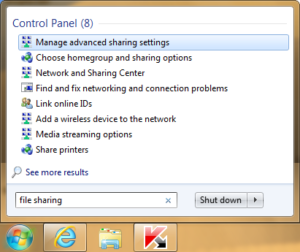
Step 1: Configure File Sharing
- Click on Start and then type in “File Sharing” in the search box and select “Manage advanced sharing settings” in the list. (See image on the right for example).
- In the “Advanced Sharing Settings” window, set the settings as follows:
- Network discovery: Turn on
- File and printer sharing: Turn on
- Public folder sharing: Turn on
- Password protected sharing: Turn off
Step 2: Copy Files Into Public Folders
The public folders are located in “C:\Users\Public” on your computer. Inside there are public folders for videos, pictures, music, and etc. Copy or move the media files you wish to share into these folders. Warning: Because these are public folders, everyone on your local network will be able to read/write to these folders. Take necessary precautions.
Step 4: Browse Files On Media Player
Reboot the player by disconnecting all power from the player and restarting it. Connect the media player to the network and select “Network” from the main menu to browse for available folder shares. Refer to the media player’s user manual for additional details.
(Optional) Step 5: Sharing Other Folders
If you wish to share folders other than the “Public” folders, follow these steps:
- Find the folder you wish to share
- Right-click on the folder and choose “Properties”.
- In the “Sharing” tab, click on “Advanced Sharing”.
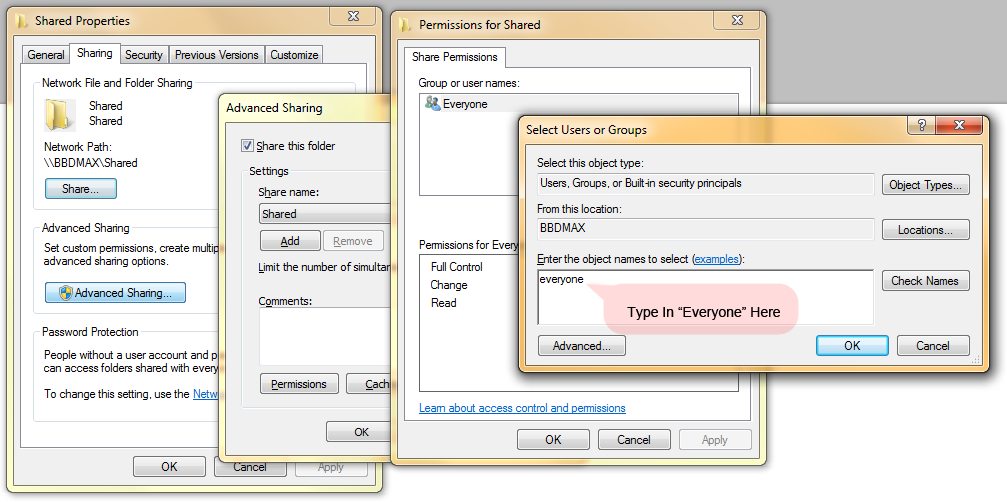
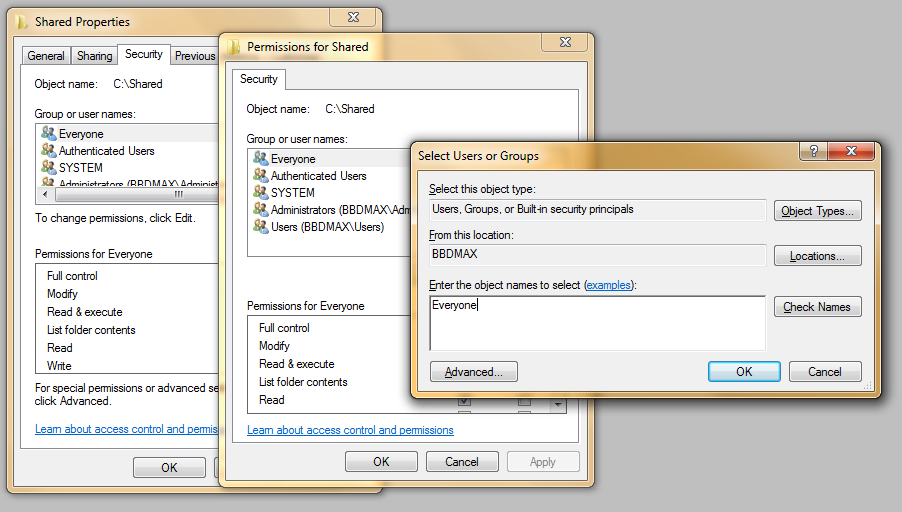
- Check “Share this folder”, and then click on “Permissions”.
- If “Everyone” is not listed under “Group or user names”, click on “Add” and type in “Everyone” and click “OK”. Make sure “Everyone” has at least “Read” permission checked.
- Click “OK” to accept changes until you get back to the “Sharing” tab.
- Switch to the “Security” tab. If “Everyone” is not listed under “Group or user names”, click on “Edit”, then click “Add”, type in “Everyone” and click “OK”.
- Click “OK” until all windows are closed.
Micca OriGen/OriGen+ Driver Install – Windows 10
The Micca OriGen and OriGen+ uses a VIA USB interface chip which now enjoys support from Windows 10’s built-in USB Audio 2.0 drivers. For the time being, the installation is not automatic and involves some manual steps. Please follow the steps below to make this installation:
- Connect the OriGen to your computer.
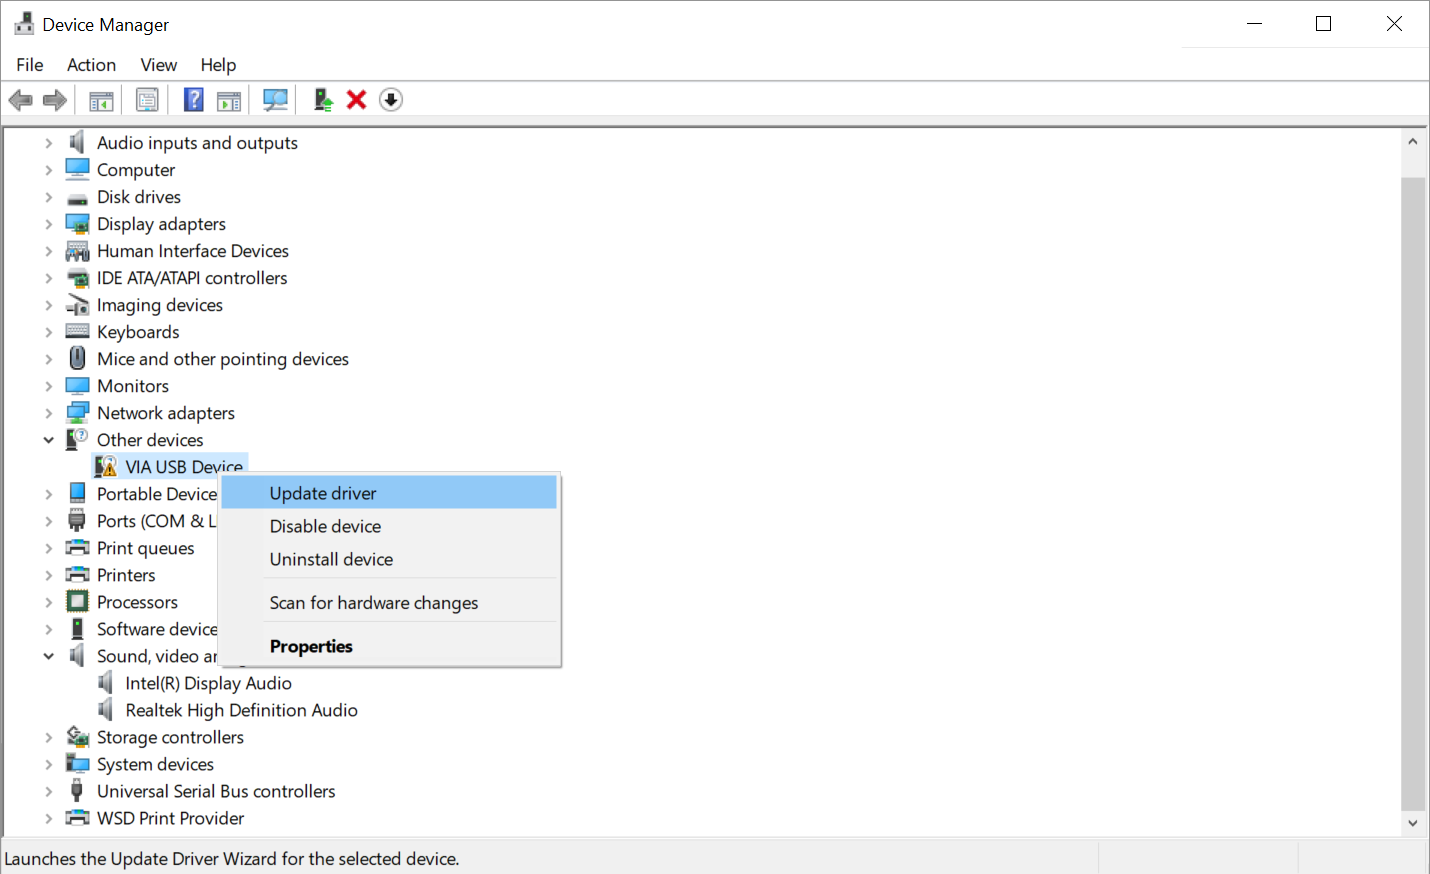
- Click on the Windows icon on the lower left hand corner and type “Device Manager”, click on the Device Manager in search results. When device manager opens, look for “VIA USB Device” which should be listed with a yellow triangle. Right click on “VIA USB Device” and select “Update Driver”, as shown below.
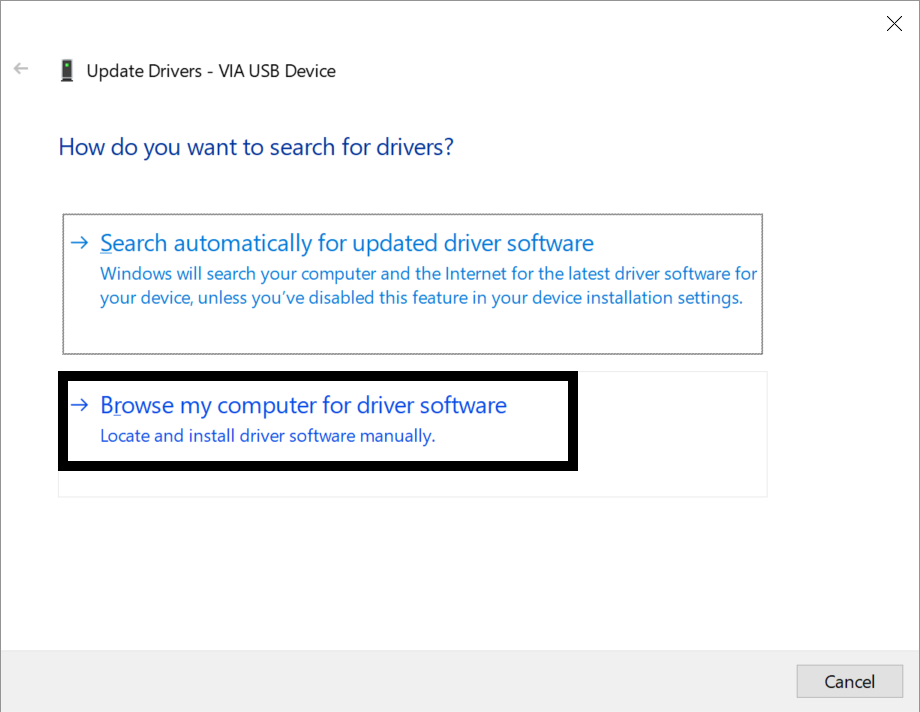
- In the window that opens, select “Browse my computer for driver software”, as shown below:
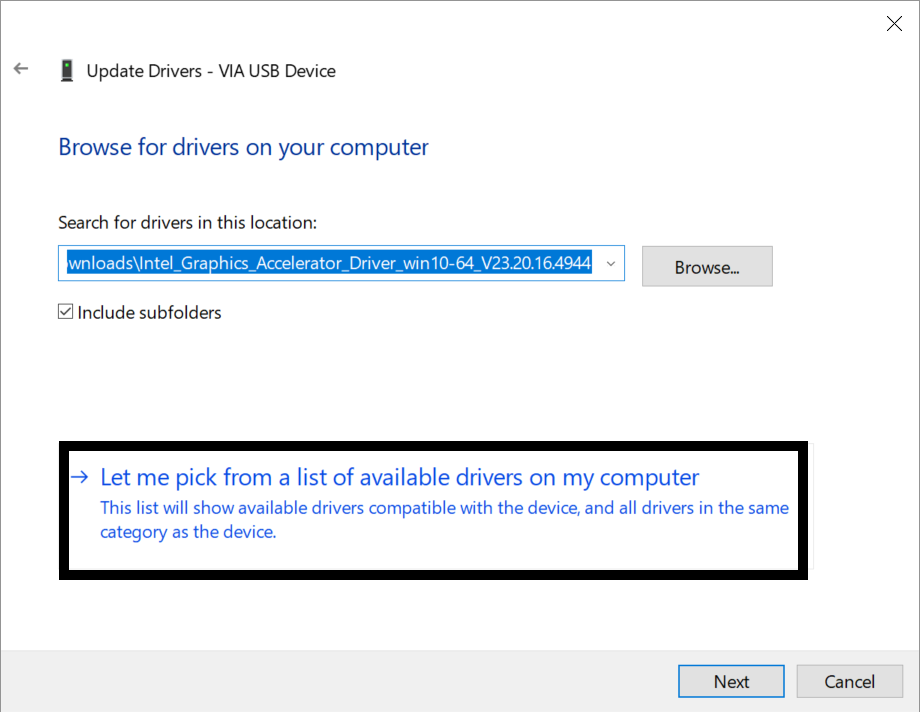
- On the next window, select “Let me pick from a list of available drivers on my computer”, as shown below:
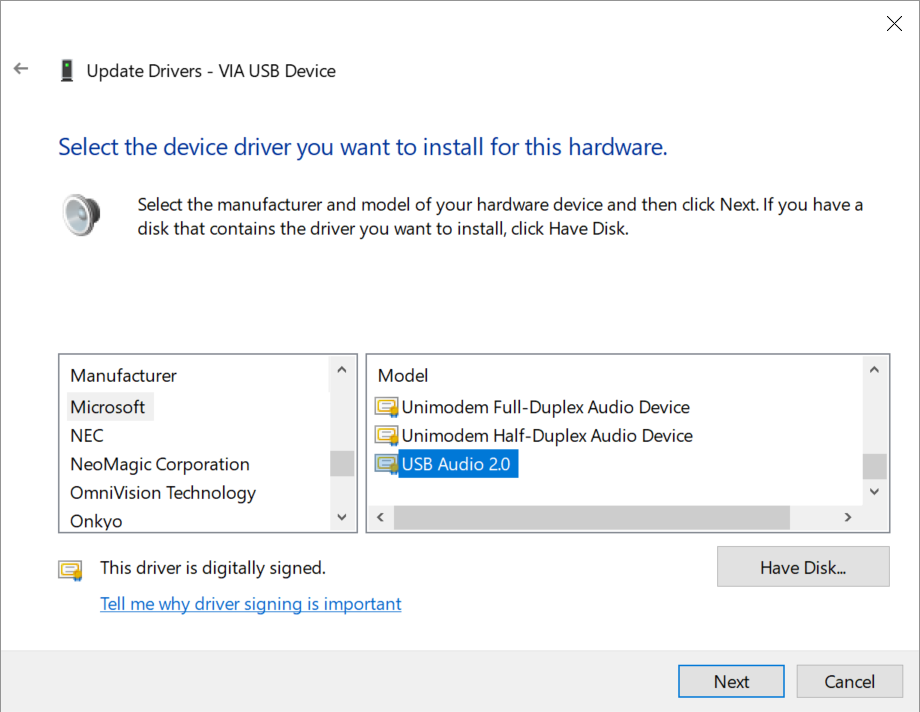
- On the next window, under Manufacturer, select “Microsoft”. Under Model, select “USB Audio 2.0”, and click next, as shown below:
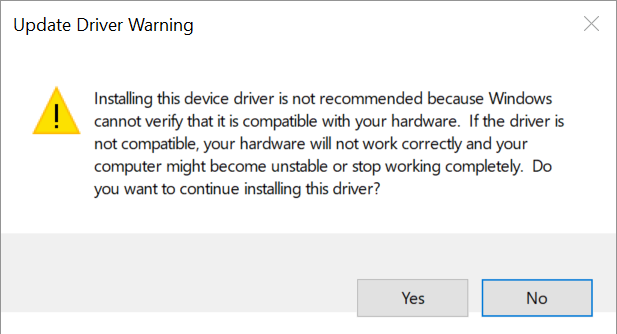
- A warning will pop up asking you to confirm that you want to use this driver, click “Yes”, as shown below:
That’s it! The OriGen should now work.
If you wish to use the VIA-supplied drivers instead of Windows USB Audio 2.0 drivers, please follow the instructions below:
With more recent releases of Windows 10, the driver installation sequence has changed in a way that was not anticipated in the Micca OriGen driver package. While we work on a driver package update, please observe the following instructions when installing the driver on Windows 10:
- Be sure the OriGen is not connected to the computer.
- Download the OriGen driver package to your computer’s “Downloads” folder, and extract it.
- Inside the driver folder, right-click on “Step-1-Turn-On-Install-Mode” and select Run as administrator. A window will pop up showing execution results – if you see an error that “Secure Boot” has prevented the settings change, you must temporarily disable Secure Boot and execute this step again. Microsoft provides instructions on how to disable Secure Boot in this tutorial: [link to tutorial]. If no errors are displayed, restart your computer when prompted.
- Once the computer finishes restarting, Inside the driver folder, double-click on “Step-2-Install-Driver”. Follow the install prompts and on the final screen click No, I will restart my computer later and click Finish.
- At this time, connect the OriGen and turn it on.
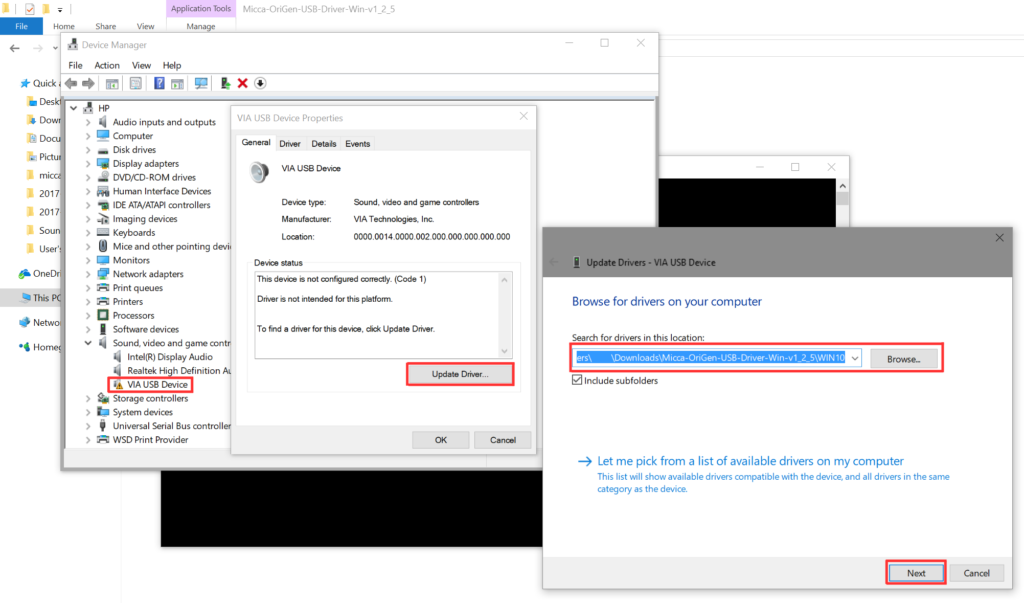
- In the driver folder, double-click on “Step-3-Fix-Driver-Association”, the Device Manager window will open. Expand the Sound, video and game controllers group, there should be a VIA USB Device listed with a triangle exclamation mark.
- Right click on the VIA USB Device and select Properties, the pop up box will show the error “Driver is not intended for this platform”.
- Click on Update Driver, then click on Browse my computer for driver software. Click on Browse and navigate to the driver folder, and the sub folder “WIN10”, Click Next when ready. The driver will be installed correctly.
- Inside the driver folder, right-click on “Step-4-Turn-Off-Install-Mode” and select Run as administrator. Restart your computer when prompted.
The last few steps should look similar to the screen shot below:
Micca OriGen/OriGen+ Does Not Support DTS or Dolby AC3 Signal
 The Micca OriGen/OriGen+ supports PCM or DSD audio decoding over USB. It does not support decoding of DTS or Dolby AC3 audio streams. Furthermore, it is limited to decoding PCM signals over the optical input since DSD cannot be transmitted over an optical connection due to bandwidth limitations.
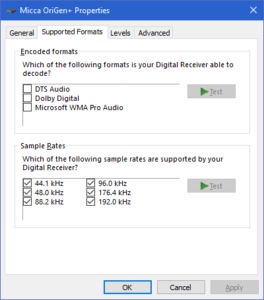
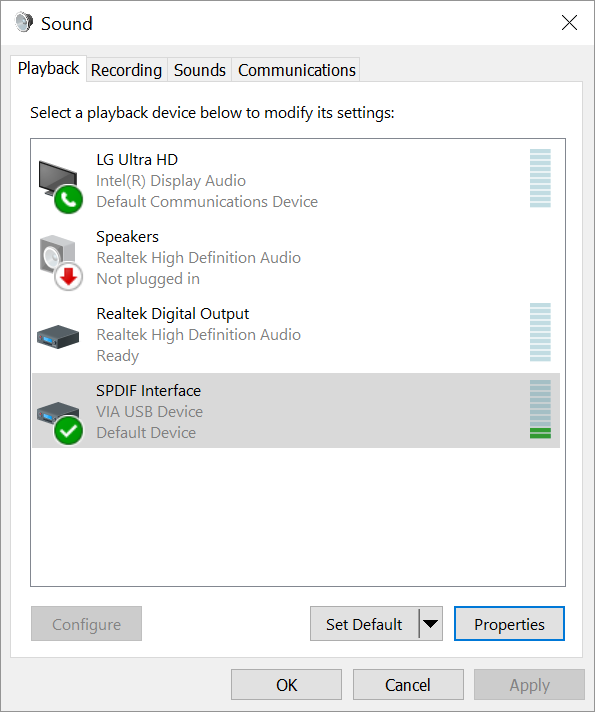
When configuring the OriGen/OriGen+ device properties, be sure that “DTS” and “Dolby Digital” checkboxes are unchecked. Similarly, if you are connecting the OriGen/OriGen+ to the optical output on your computer, check that the device properties for the optical output also has the “DTS” and “Dolby Digital” checkboxes blank. This ensures that the computer will perform decoding of DTS and Dolby signals, and output the audio in PCM format.
Micca OriGen no signal from optical S/PDIF output
The OriGen’s 3.5mm jack also doubles as a optical mini output jack. When it is working, the jack will glow red indicating that a signal is present. While this output will work for most situations, there are three known limitation with the optical S/PDIF output where it will not produce any output:
- If the PCM signal is 32-bit 192kHz as this exceeds optical specifications. The limit is 24-bit 192kHz.
- If the output mode is ASIO. The VIA USB chip only supports S/PDIF output when the data stream is Direct Sound or WASAPI.
- When used with certain Android phones over USB OTG, since certain Android implementations lack the necessary endpoint support for S/PDIF output.
Micca Speck G2 Not Reading USB Hard Drives
Micca Speck G2 supports USB flash drives and USB hard drives that are 2TB or smaller in size. In the past, all drives smaller than 2TB have shipped from the factory with MBR partition tables, which is supported nearly universally by computers and electronics. Recently, manufacturers like Western Digital and Seagate have begun shipping newer USB hard drives with GPT partition table even for drives that are 2TB or smaller. This has caused numerous issues with users of older version of Windows, various backup software, and many media devices like the Micca Speck G2. When the Micca Speck G2 encounters such a drive, it will show the USB drive letter, but not be able to read any of the files.
For everyday users, there is no practical difference between MBR and GPT, especially when it comes to a USB hard drive that is used to carry large amount of files in bulk. Therefore, this guide shows you how you can take a USB hard drive that is 2TB or smaller, check to see if it is using GPT, and switch it to using MBR instead. Doing so not only makes the drive compatible with the Micca Speck G2, but with all other computers and electronics.
1. Check The Partition Type
We start by checking the partition type of the drive you have.
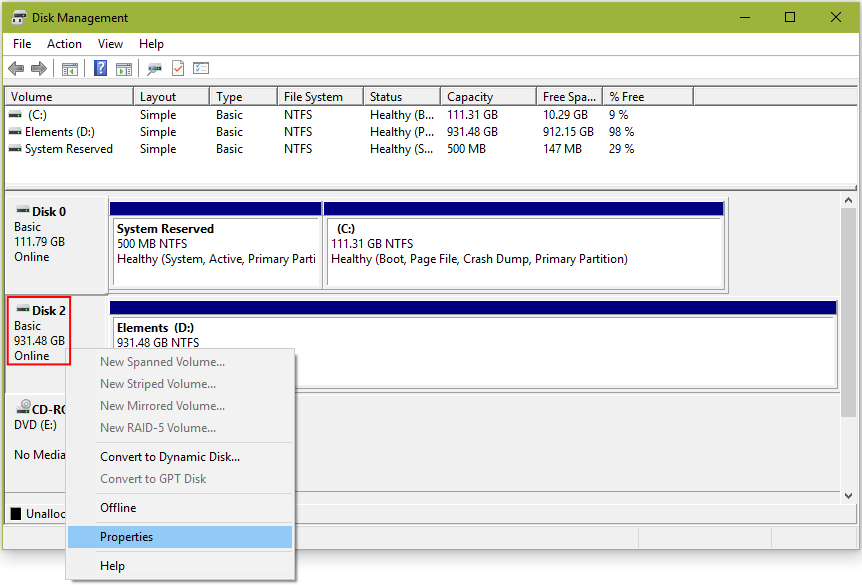
- Press the “Windows” key on the keyboard and type “Drive Management” and press enter. This will open the Disk Management window. Your USB drive will be listed as one of the drives detected.
- Right click on the square that matches your USB drive and select “Properties”, in the example below, our USB drive is “Disk 2”.
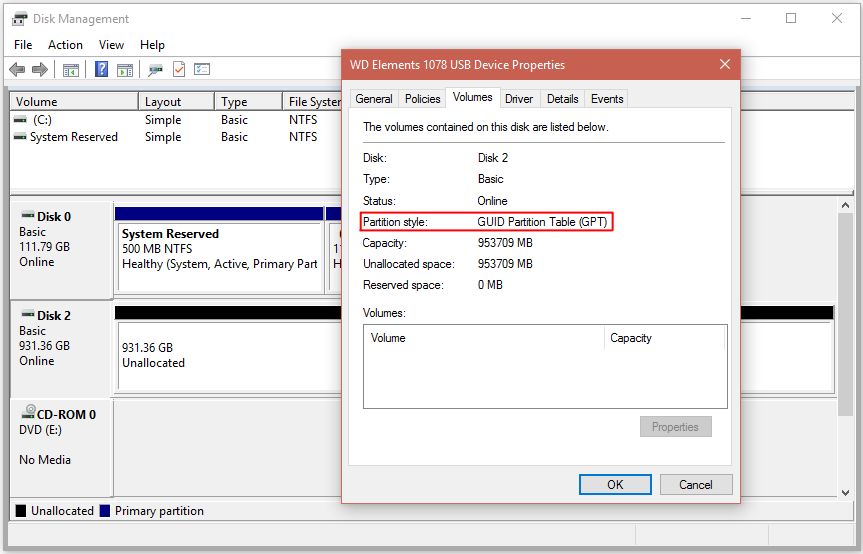
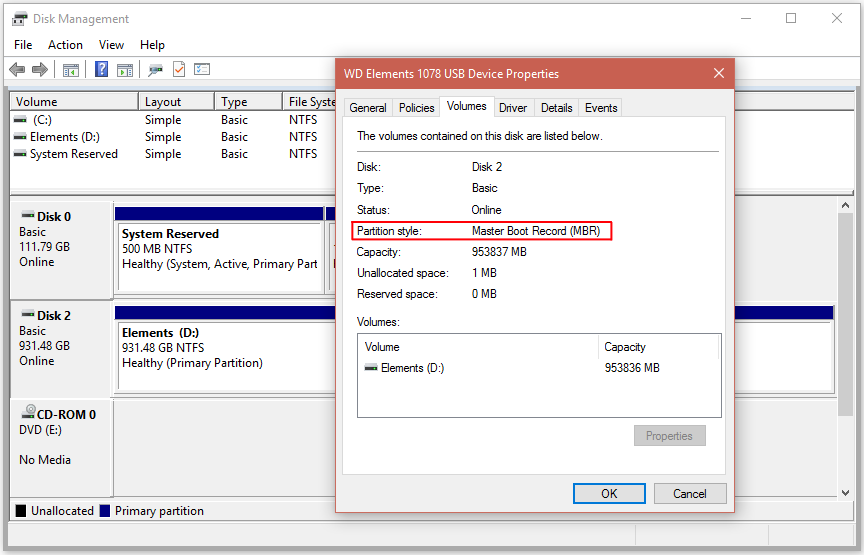
- In the pop up window, switch to the “Volume” tab. If the drive is using MBR partition, it will have a partition style of “Master Boot Record”. If instead it uses GPT, it will have a partition style of “GUID Partition Table”. In our example below, the partition style is GPT, meaning the drive should be converted to MBR in order to be used with the Micca Speck G2.
2. Backup Your Files
Changing the partition table from GPT to MBR will erase the content of the drive, so be sure to start by copying the files off of the drive to a safe location. You will copy the files back onto the drive when done.
3. Change Partition Style to MBR
Once you are sure you’ve backed up all your data in a safe place, we can begin changing the partition type. Do not proceed unless you are absolutely certain that the data has been copied somewhere safe.
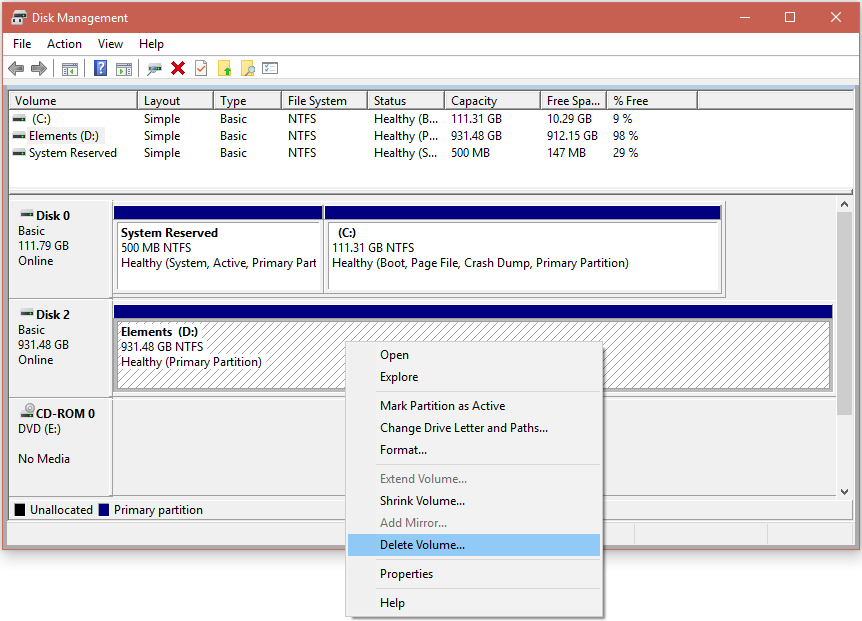
- In the Drive Management window, right click on the block that represents your USB hard drive’s partition and select “Delete Volume…”. You will be asked to confirm the action. Do not proceed unless you are absolutely certain that the data has been copied somewhere safe.
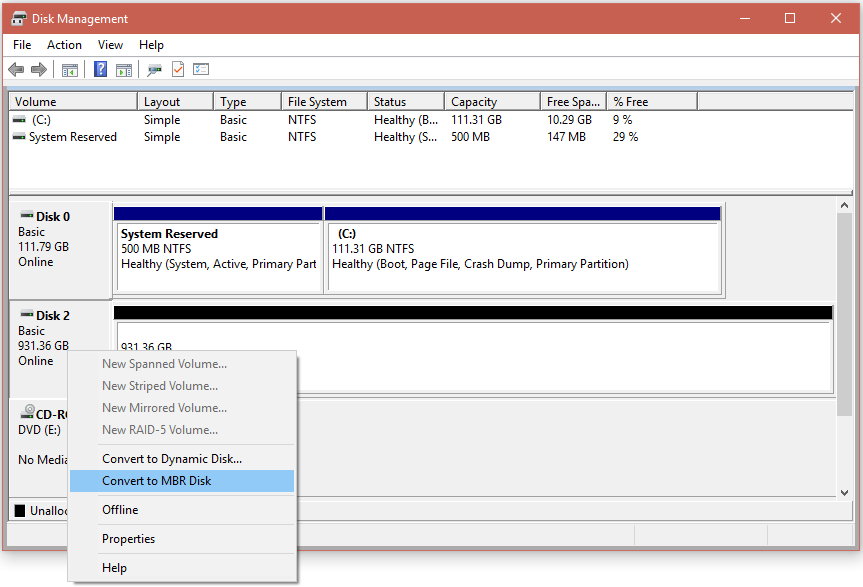
- Right click on the square that represents your USB drive and select “Convert to MBR Disk”, as illustrated in the photo below:
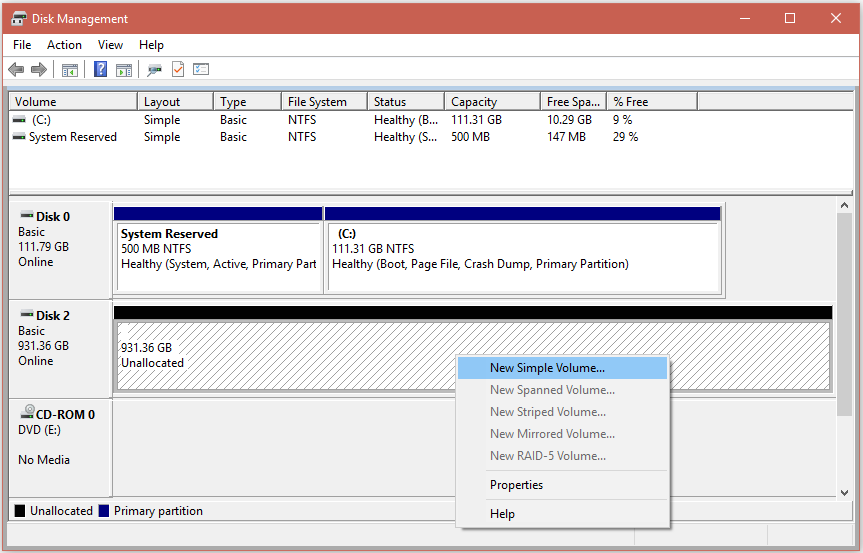
- Once the conversion is done, you need to create the primary partition. Do so by right clicking on the block that says “Unallocated” and select “New Simple Volume”, as illustrated below:
- Click “Next” through all the steps in the new volume creation wizard and click Finish to complete. The computer will take a bit of time creating the new partition and giving it a quick format.
- You can confirm by checking the drive partition style again that it now shows “Master Boot Record”, as illustrated below.
- Now you can copy all your files back onto the drive and use it with the Micca Speck G2 without any issues!
How to rename photos in bulk
As we collect and copy photos from different sources, such as a cellphone, family and friends, or from the web, the image file names can sometimes become very long and complicated. This can cause issues when attempting to display such photos on a photo frame.
It is recommended that the file names be renamed to something more compact and meaningful, such as “wedding-day-1234.jpg” or “2016-11-29_1234.jpg”, which is much easier to organize. Renaming photo files like this will also resolve many photo frame display issues caused by long and complicated file names.
This tutorial will walk you through the steps of renaming photos in bulk using the freely available software tool FastStone Image Resizer. At this time, this software tool is only available for Windows. Luckily, there is an existing bulk file rename feature built in to the Mac OS X Finder, and a great tutorial on how to use it is here: Link to Mac Tutorial.
For those of you using Windows, please follow the steps below to rename images in bulk.
- Copy the image files you have onto a SD card or USB drive. Make sure that the card or USB drive has only those image files you want to rename. Keep your original image files in a safe backup location.
- Download and install FastSTone Image Resizer program from the FastStone website: http://www.faststone.org/FSResizerDownload.htm
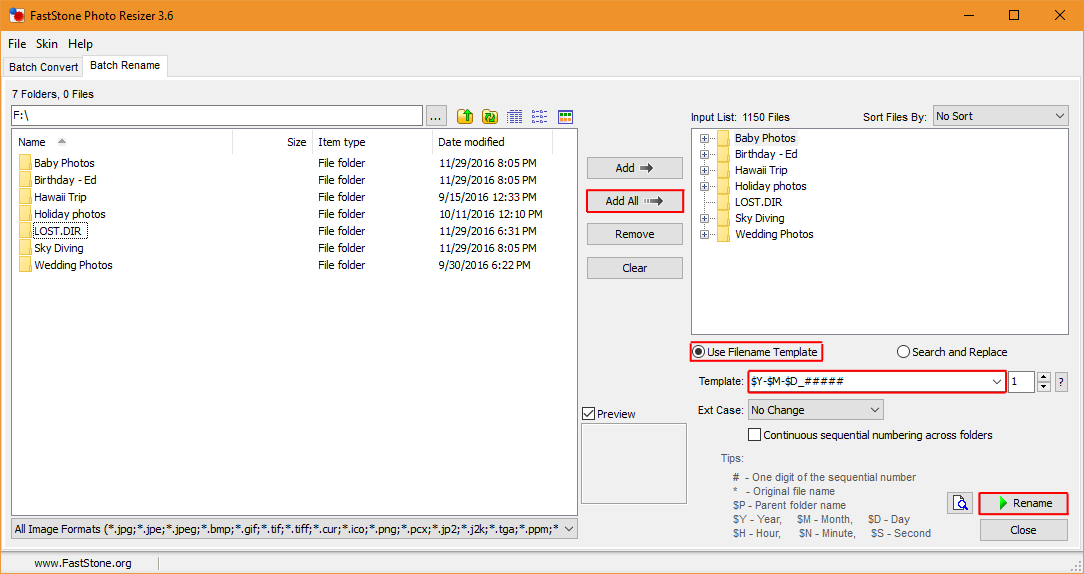
- Run the FastStone Image Resizer program. A window will open like the one below. Click on the “Batch Rename” tab at the top of the window, then find your SD card or USB drive in the list and double click on it. For the purpose of our tutorial, the USB drive we are using is named “ADATA UFD” and has drive letter F.
- Next, click on the “Add All” button, this adds all of the folders and images found on the drive to the list of files to be renamed.
- Make sure that “Use Filename Template” is selected. Click on the “Template” drop down box, and select “$Y-$M-$D_#####”. This renames the files based on the photo date, which is the most popular option. There are other renaming templates, which you can feel free to explore and see which one works best for you.
- Once the above options are set click “Rename” button.
- The program will then proceed to rename all of the image files on the SD card or USB drive based on the settings.

And that’s all there is to it! If you run into any issues following this tutorial, please don’t hesitate to contact us for support by clicking on the “Support” tab of the product page, or by simply emailing support@miccatron.com.
How to set the date and time in M707Z, M808Z, and M1010Z photo frames
To set the date and time in the Micca M707Z, M808Z, and M1010Z photo frames, please follow the directions below:
- Press the Setup button on the remote control, or select the Setup icon from the main menu.
- Scroll down to Set Time/Date and press the OK button.
- Year will now be highlighted. Use the UP and DOWN buttons on the remote to select the date or time field you want to set, press OK to set that field, the field text will turn red.
- While the field is red, use the LEFT and RIGHT buttons to change its value. Press OK when finished, the field text will turn white again.
- When done changing all of the fields, scroll down to Save Time, and click the OK button to save all changes.
Windows 10 (1803) Audio Device Settings
The new Windows 10 1803 release changed the way that audio device settings are accessed. If you right click on the speaker icon on the lower right hand corner of the screen and click on “Open Sound Settings”, this brings you to the new Windows 10 style settings menu rather than the older “Control Panel” style settings page. Unfortunately, this page seems to currently have some issues as users report that settings made on this page are not being stored correctly and revert back to the old values. Instead, follow the steps below to access the original “Control Panel” style settings:
- Click on the Windows icon on the lower left hand corner of the screen and type “Sound”, then click on the “Sound” icon from the search results.
- The menu that pops up is the “Control Panel” style sound settings, and settings made here will be saved without any issues
What’s the difference between Micca MPLAY-HD Mini and Micca Speck G2?
Micca recently released the new MPLAY-HD Mini digital media player, positioned as an affordable upgrade to the Speck G2. The MPLAY-HD Mini shares the same compact aluminum design, but offers a host of upgrades in capability with only a modest increase in price. Here are the main improvements that the MPLAY-HD Mini has over the Speck G2:
Please note that despite these improvements, the MPLAY-HD Mini still has some limitations that are important to keep in mind: it does not play HEVC/H.265 videos, 10-bit MKV, or videos with resolution higher than 1920x1080p, such as 4K videos.
| MPLAY-HD Mini | Speck G2 | |
| Playback image quality | Excellent | Good |
| Video bit-rate support | 40mbps | 10mbps |
| MP4 video file size | No size limit | 4GB max |
| ISO video file support | DVD and BD | Not supported |
| HDMI audio output | PCM stereo, 5.1/7.1 surround | PCM stereo only |
| Subtitle support | SRT, SUB+IDX, PGS | SRT |
| Video resume play | Automatic resume on power up | Manual resume by selection |
| Hard drive support | Up to 4TB | Up to 2TB |
| File system support | FAT/FAT32/exFAT, NTFS, HFS+, EXT3 | FAT/FAT32, NTFS |
| USB host ports | 2 | 1 |
| Memory card reader | microSD | SD |
| External IR sensor jack | Yes | No |
Micca MS10/MS12 Subwoofer No Sound
There have been a small number of Micca MS10 and MS12 subwoofers that does not play sound when received by the customer. The symptom is that the subwoofer turns on, the power light turns blue, but there is no sound. The cause of this is that an internal subwoofer connector has come loose during shipping and need to be plugged back in. If your subwoofer has this behavior, please follow the steps below to check if it applies to you. Please read the instructions carefully and if you are not comfortable doing any of the steps, please contact our support and we will exchange the subwoofer for you. The steps here are to save you the trouble of boxing up the subwoofer and returning it.
Step 1: Remove all audio connections.
Step 2: Use a philips screw driver, remove the 12 screws along the border of the metal amplifier plate on the back of the subwoofer.
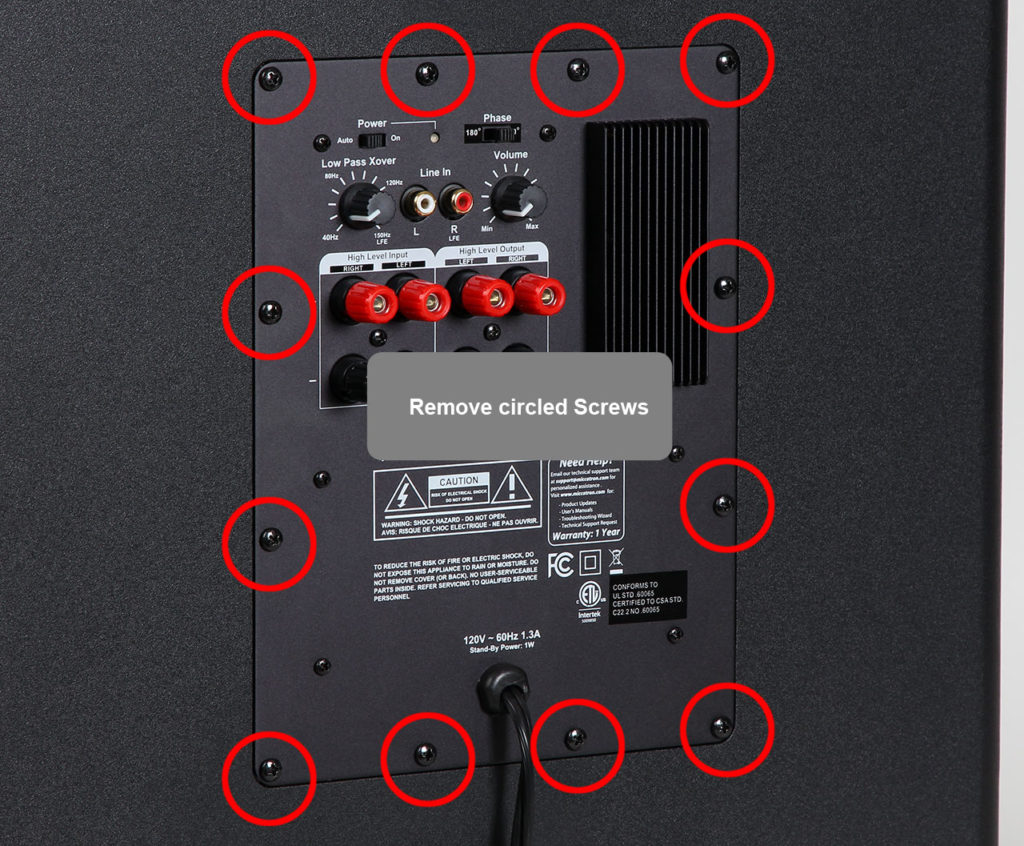
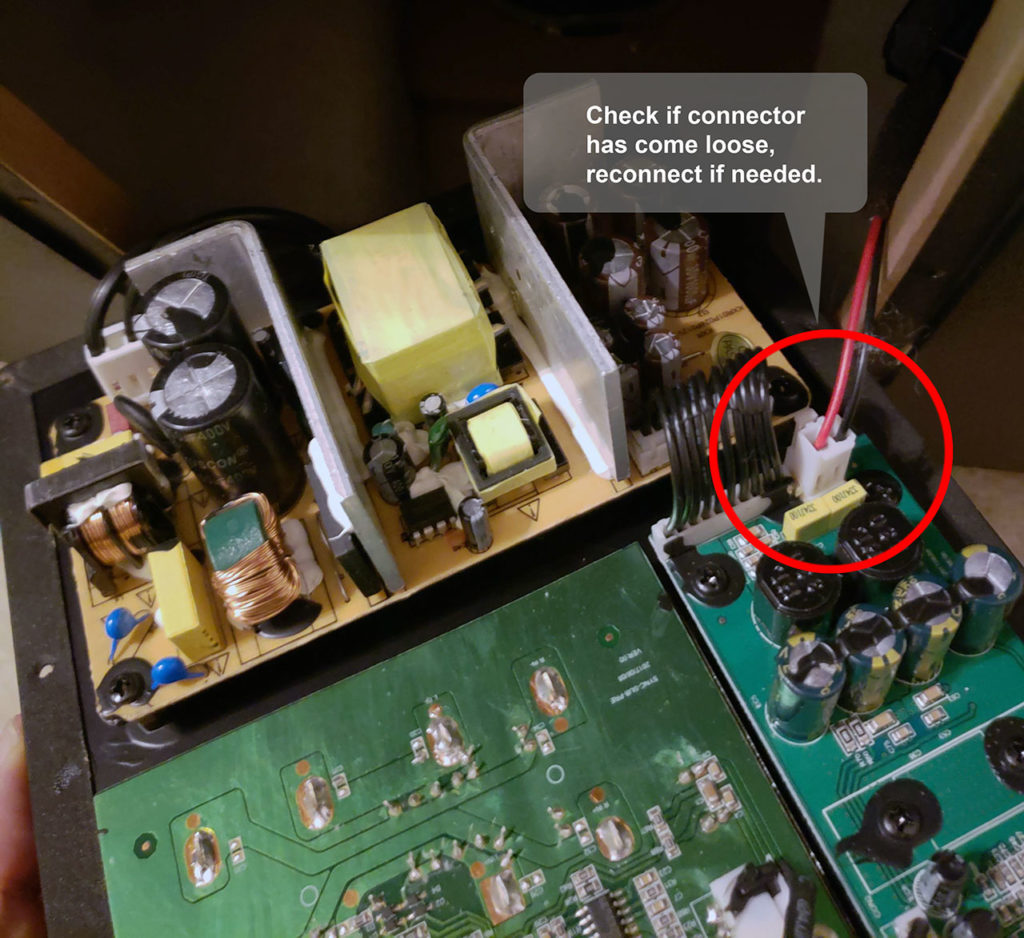
Step 3: Tilt the amplifier out and check if the connector at the circled location below has come loose. Reconnect the connector if necessary. Note that the red wire is to the left, and black wire to the right
Step 4: Reinstall the plate amplifier, hand tighten all 12 screws along the border of the metal amplifier plate.
Step 5: Reconnect audio connections, and plug the subwoofer back into AC power. The subwoofer should now be working correctly. If you continue to experience issues, please contact email support@miccatron.com and we will provide additional assistance.
Micca MPLAY-HD Mini does not turn on or has no power
The MPLAY-HD Mini is designed to automatically power on after plugging in the power adapter. If the power light does not turn green (or blue in older versions) when you plug in the power adapter, please check to ensure that you’ve plugged the power adapter into the power jack on the MPLAY-HD Mini. The yellow colored AV jack is 3.5mm and is the same size hole as the power jack, and some customers have accidentally plugged the power adapter into the AV jack. This does not damage anything, but will cause the MPLAY-HD Mini to not turn on. Please check to make sure that you’ve plugged the power plug into the correct power jack on the MPLAY-HD Mini.
Micca MB42 vs MB42X, What’s the difference?
When it comes to the MB42 vs MB42X decision, it’s important to understand the similarities and differences between these two speakers. We hope this guide is helpful in making the right purchase choice.
Similarties
The MB42 and MB42X uses the same drivers, consisting of a 4-inch carbon fiber woofer, and 0.75-inch silk dome tweeter. Both use the same size enclosure and the same tuning frequency. With their grills on, it is difficult to tell them apart visually from a few feet away.
Differences
Even though the MB42 and MB42X share the same drivers and enclosure design, the MB42X represents a sizable upgrade in terms of audio performance. The most significant improvement offered by the MB42X over the MB42 is the inclusion of a 9-element crossover network. This crossover significantly improves the tonal balance and clarity of the speaker and is what’s responsible for the MB42X being such a favorite among hi-fi enthusiasts. There are also other improvements included in the MB42X, such as a flared port tube and a magnetic grill system. Lastly there is the cosmetic difference of a matte black finish on the MB42X, versus the black faux wood grain on the MB42.
The table below contains the differences between the MB42 and MB42X.
| MB42 | MB42X | |
| Woofer | 4-Inch Fiber Woofer | 4-Inch Fiber Woofer |
| Tweeter | 0.75-Inch Silk Dome | 0.75-Inch Silk Dome |
| Crossover | None, protective capacitor on tweeter | Advanced 9-element crossover, 18dB/Octave woofer and tweeter |
| Enclosure material | MDF | MDF |
| Enclosure Finish | Black faux wood grain vinyl | Matte black vinyl |
| Tuned Port | Cardboard tube | Plastic tube, external flare |
| Protective Grill | Cloth, peg mount | Cloth, magnetic mount |
Micca Speck G3/4K Firmware Update Recovery Procedure
In the process of performing firmware updates for the Micca Speck G3/4K digital media players, if the process is interrupted or if an error occurs in the upgrade process, the media player may become stuck in an intermediate state and not complete the firmware update process. In order to recover the media player from this state, please follow the instructions below.
These procedures require a Windows PC and a microSD card between 2GB to 32GB in size. This process will not work with USB drives or microSD cards larger than 32GB.
1. Download and Unpack the Software Package
- Download the software package using the button below:
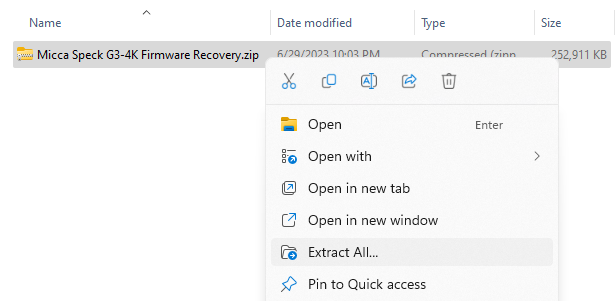
- Right click on the downloaded software package and select “Extract All” and then confirm by clicking on the “Extract” button:
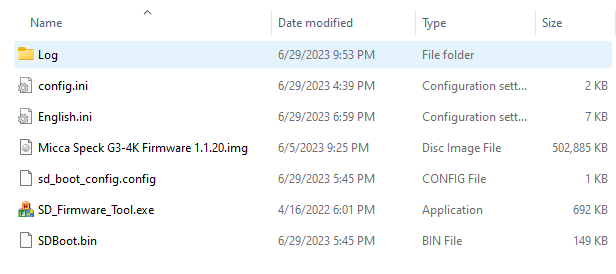
- The file explorer should automatically display the extracted files:
- Double-click on the SD_Firmware_Tool application to run it.
Download <<< Click to Download!
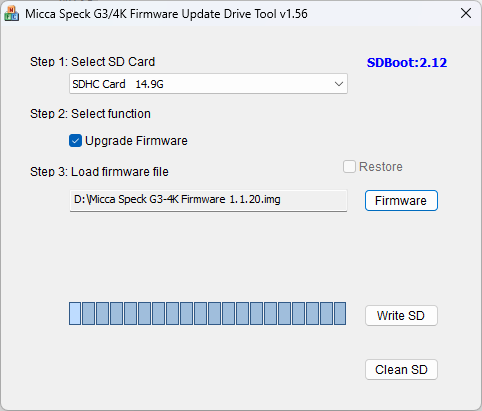
2. Create Firmware Update Drive
- Insert the microSD card into a card reader on your computer.
- In the firmware update drive tool window, follow the steps 1, 2, and 3 as guided on screen. Make sure you have selected the correct microSD card in step 1. Selecting the wrong drive will cause permanent data loss.
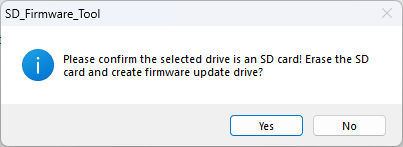
- Click on the Write SD button to write the firmware to the microSD card. A confirmation prompt will be displayed. Make sure you have selected the correct microSD card in step 1. Selecting the wrong drive will cause permanent data loss. Do not proceed unless you are absolutely certain that the correct microSD card has been selected.
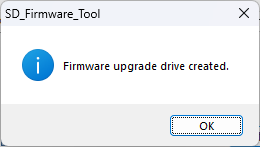
- Once the firmware update drive has been created on the microSD card, a confirmation will be displayed:
3. Upgrade Firmware
- Unplug power cable and remove all USB drives from the Micca Speck G3/4K digital media player.
- Insert the microSD card with firmware update into the Micca Speck G3/4K digital media player.
- Plug in the power cable to the media player and the firmware update process will begin:.
- After a few minutes, the firmware update will prompt the user to remove the microSD card. At this time, remove the microSD card from the player:
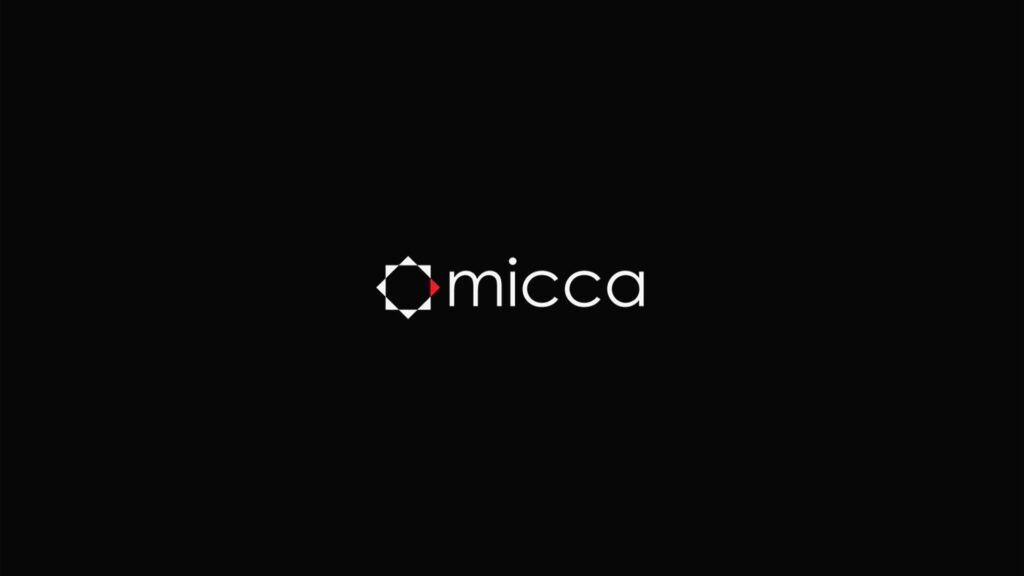
- For the next stage, the player will take some time to apply the firmware update. During this time, the Micca logo will be displayed on screen. This process may take up to 10 minutes, do not unplug power or otherwise interrupt the process.
- Once the firmware recovery process is complete, the main menu will be displayed:


At this point, the firmware recovery is complete, and you may wish to apply additional firmware updates using the normal firmware update process.